
No Results Found
The page you requested could not be found. Try refining your search, or use the navigation above to locate the post.
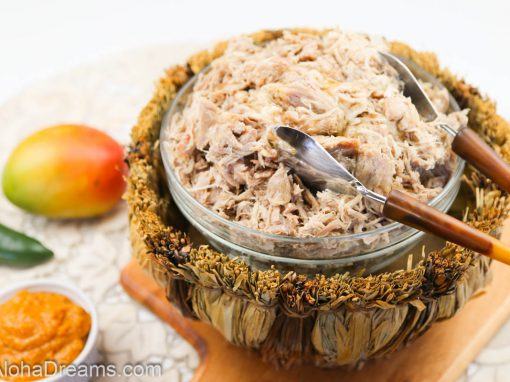


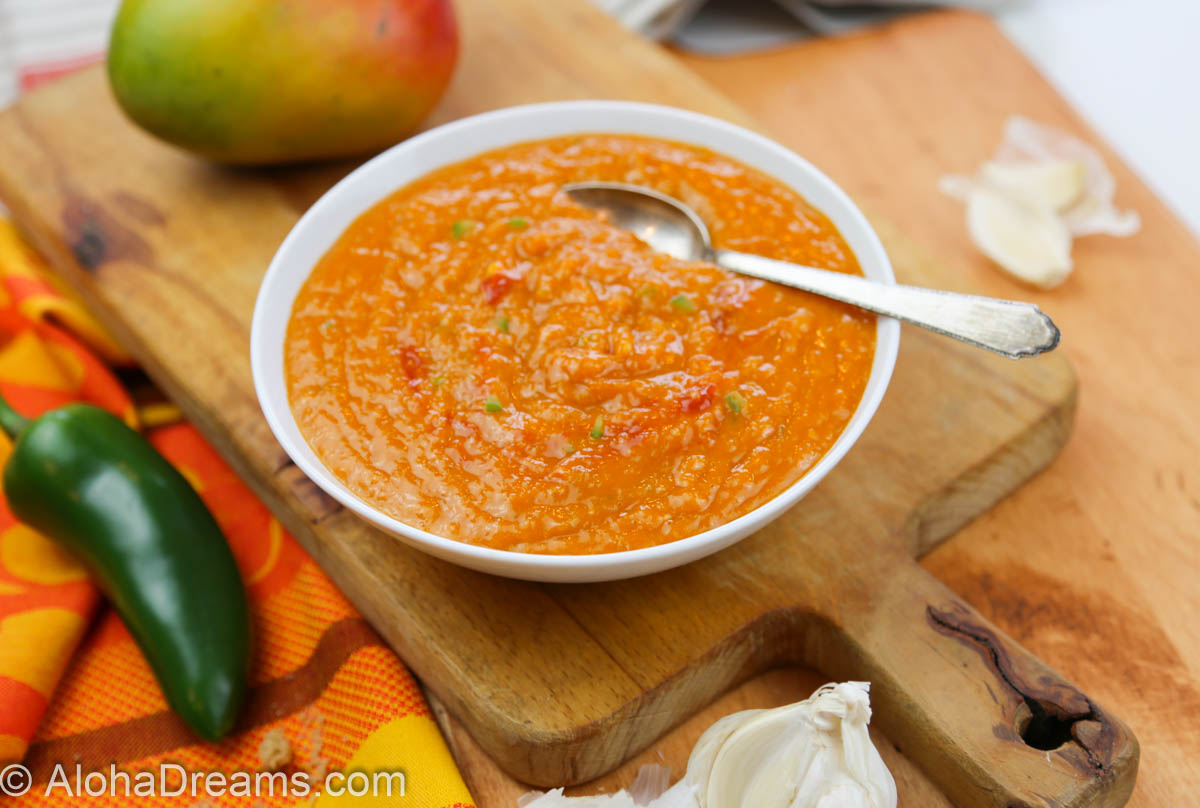
Slow cooker Kalua Pork is a quick and easy wonderful foundation for your family meal plan. Combine it with my Hawaiian Beach Club Coleslaw for fantastic sandwiches. Or enjoy it with my Maui Mango Barbecue sauce (coming this week). It’s also an outta this world topping for a fabulous Kalua pork pizza with Maui Mango Barbecue sauce, pineapple tidbits and onions (also coming this week). All wonderful, easy dishes for your family.
It’s also a great easy dish for a large group activity.
Want a luau with minimal work? This is just what you’re looking for. It doesn’t get much easier than this slow cooker Kalua Pork. It’s as close to the real thing as you’re going to get without buying a La Caja China (Which I have and love! More about cooking a pig in a La Caja China here) or digging a pit in your back yard. Note: Another option you’re cooking for a larger crowd is this easy pulled pork for a crowd recipe
As you’ve probably guessed by now, I love, love, love make-ahead dishes that hold and re-heat well. We like to entertain quite a bit and one of my cardinal rules (and it should be yours too!) when having company is to do as little at the last minute as possible. I generally plan to have only one dish on the menu which requires any last minute attention. If I’m very familiar with the recipes, at most I’ll allow for 2 last minute dishes. Anything more than that is just inviting stress and sub-optimal results. And we all have enough stress without adding any self-imposed to the pile.
Before we jump in to the cooking let me tell you a bit about this recipe. Kālua (pron. Kah-loo-a) is a Hawaiian word meaning to cook in an underground oven. Kalua is a traditional Hawaiian cooking method utilizing an underground oven called an imu. The word Kalua is also used to describe food cooked in this manner, such as kālua pig, a common luau or family gathering main dish. Here’s an emu cooking a pig for a family gathering.
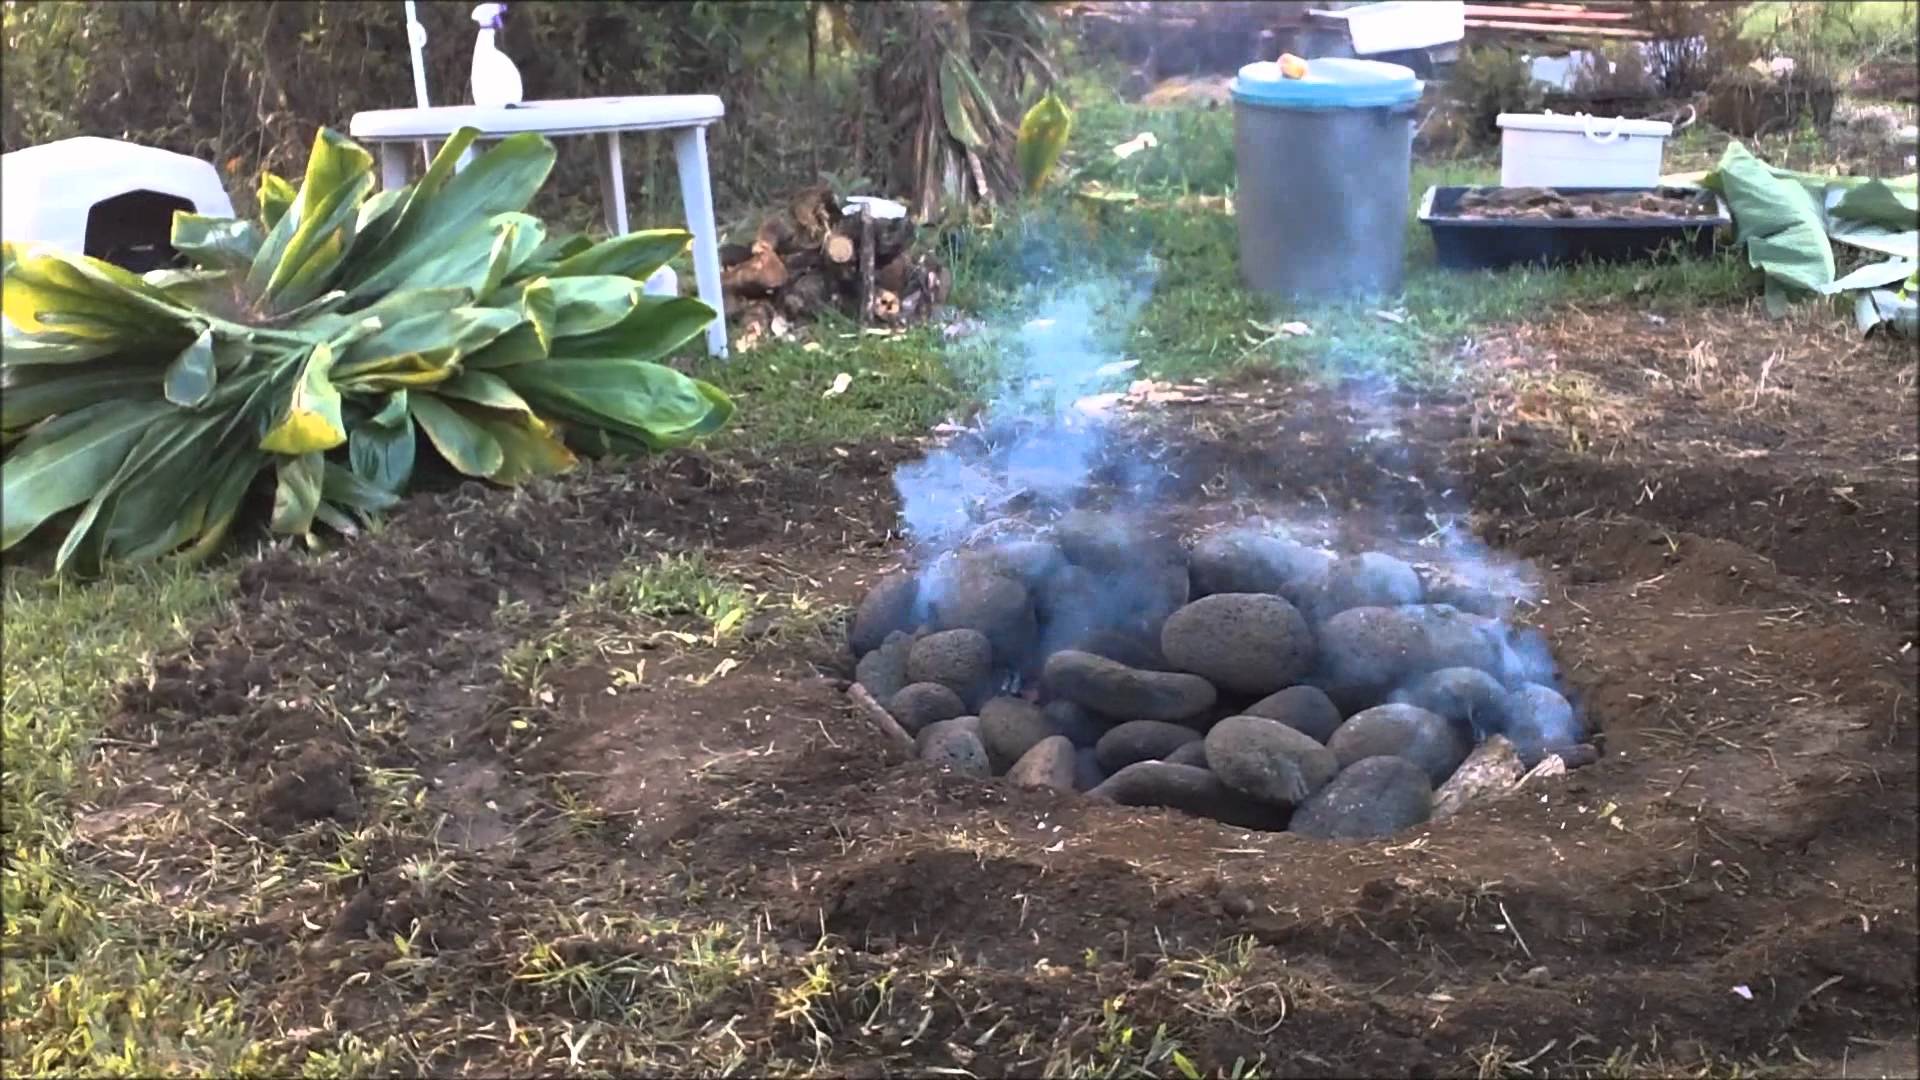
The general method for cooking kālua pig in an emu consists of first digging a large pit and lining it with banana or ti leaves. The leaves insulate the pig, facilitating the steaming process, and adding flavor. Next, ever abundant lava rocks are heated over an open flame until they are extremely hot. These rocks are then placed in the pit. Finally, a whole dressed pig is seasoned with Hawaiian sea salt and placed in the pit. It’s covered with more banana or ti leaves, soil and hot lava rocks and left to cook approximately 8 hours.
Besides being roasted whole in an emu (which we’re not going to do, thank you very much), several things characterize kālua pig: 1) the red Hawaiian salt seasoning, 2) the banana or ti leaves and 3) a slightly smoky flavor.
While you can certainly substitute Kosher salt, the red salt is fun and can be easily purchased here. Since we’re trying to make this easy, we can manage a fabulous kālua pig without the banana or ti leaves. We’ll mimic the smoky flavor with a bit of liquid smoke. By the way, my kālua pig is cooking while we speak and I WISH YOU COULD SMELL IT. Better yet, make one for yourself. It’s incredibly easy and the meat, which falls off the bone, and is very tender and moist, with a slightly salty, smoky flavor that is just delicious.
Sold yet? Great, let’s get started, shall we!
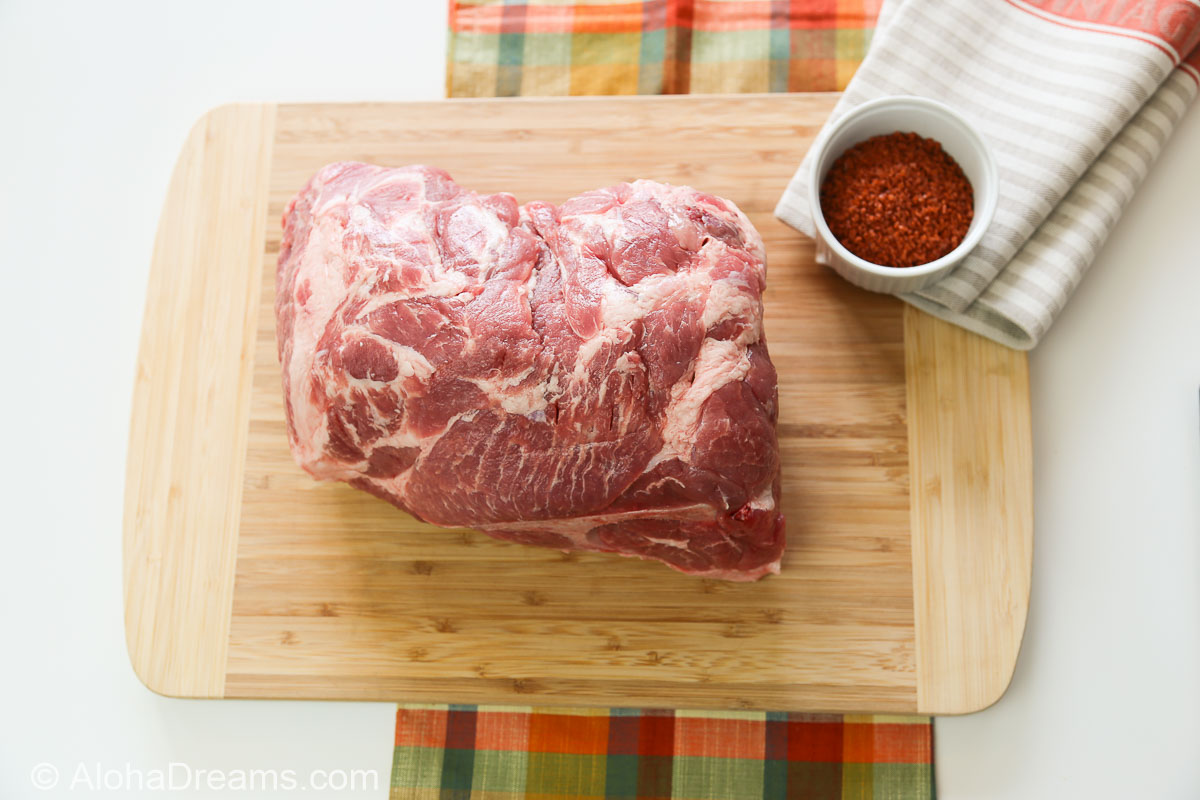
You’ll want to use a 4-6 pound Boston Butt roast like this one for the family-size recipe – or get a 9-10 pound roast if you’re cooking pulled pork for a crowd.
Begin by piercing your roast all over with a knife or fork. This enables the flavor from the salt and liquid smoke to penetrate the roast. Traditional Kaula pork is seasoned with red Hawaiian sea salt. We always pick up a bag of this salt when we go to Hawaii on vacation, but you can save some money by taking a virtual romantic Hawaiian vacation here and purchasing the salt on-line here.
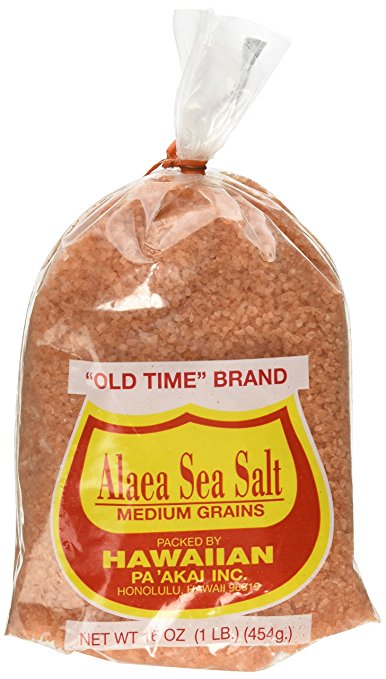
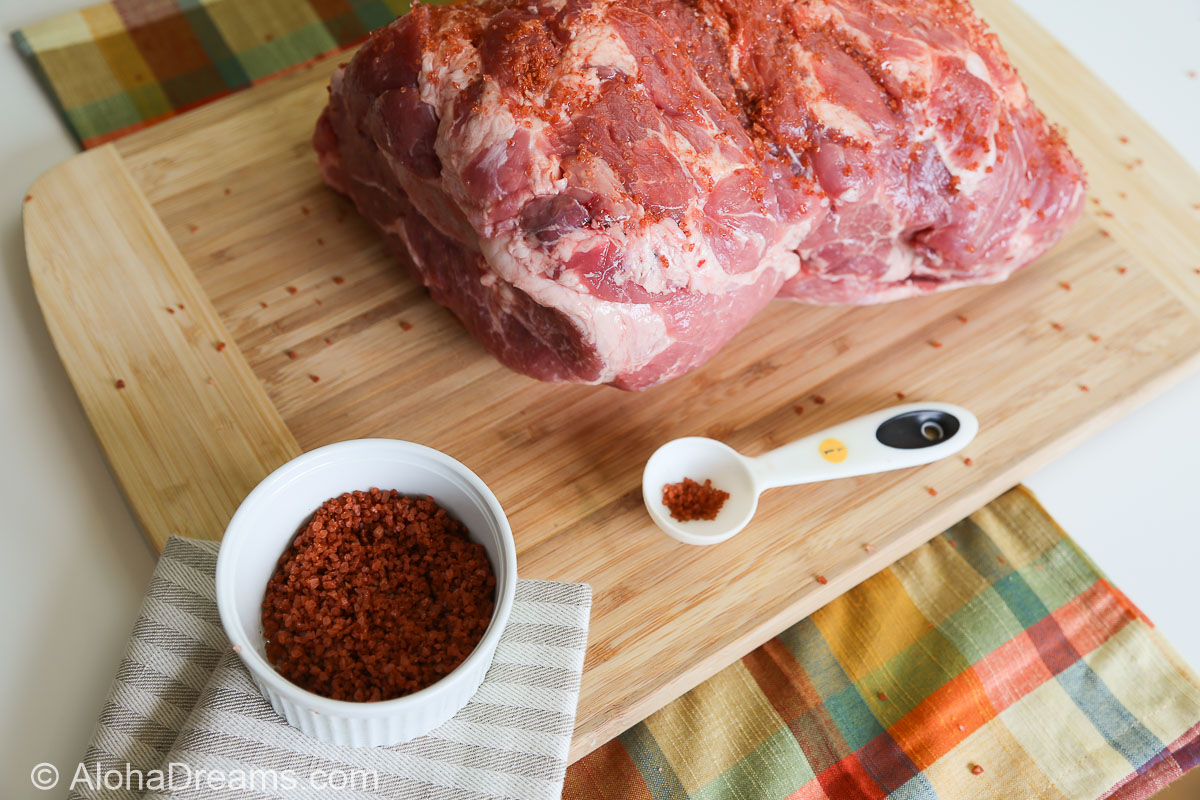
If you’re cooking a 4-6 pound roast, use 1 tablespoon red Hawaiian sea salt. Here’s the roast with 1 tablespoon of the salt rubbed on top.
If you’re cooking a 9-10 pound roast, use 2 tablespoons red Hawaiian sea salt.
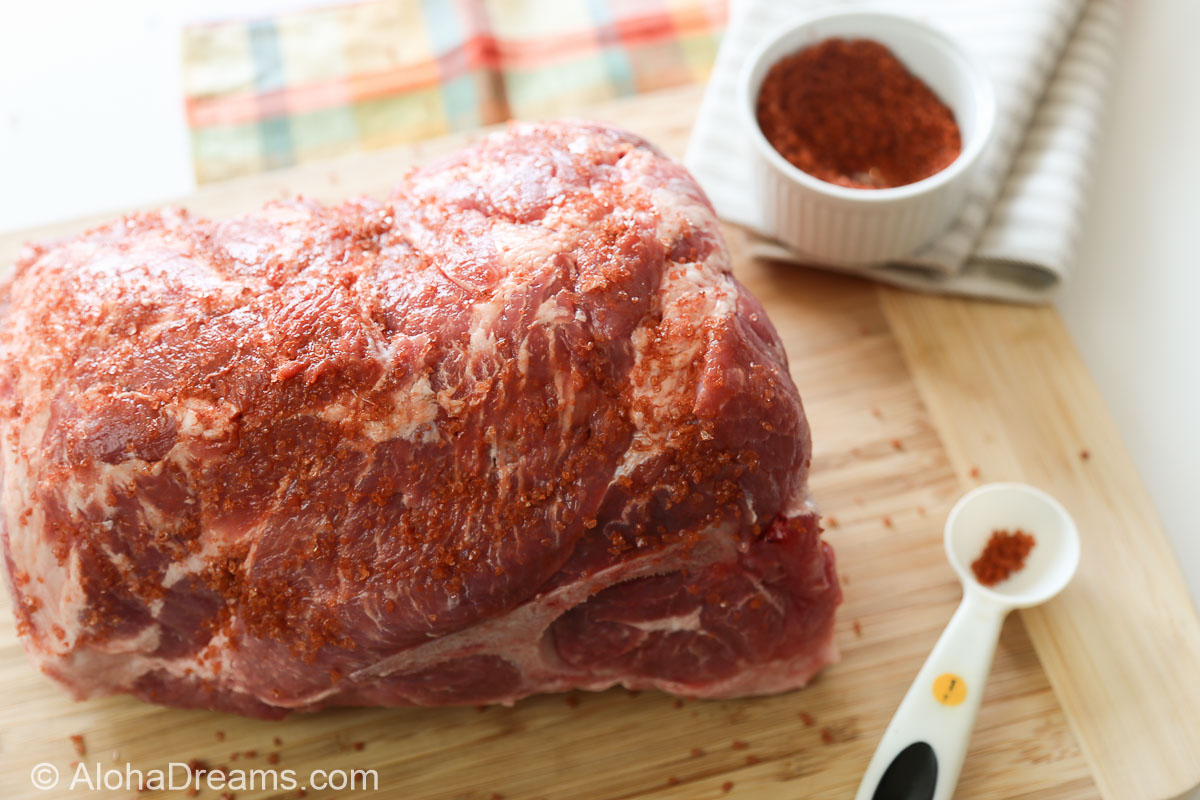
You can see it a bit better here. I know this looks like a lot of salt – but trust me you’ll want to use the full amount of salt. We’ll also be adding more later. That’s ok. This is the only seasoning this large cut of meat gets. It’s also what makes the difference between an OK result and a GREAT result.
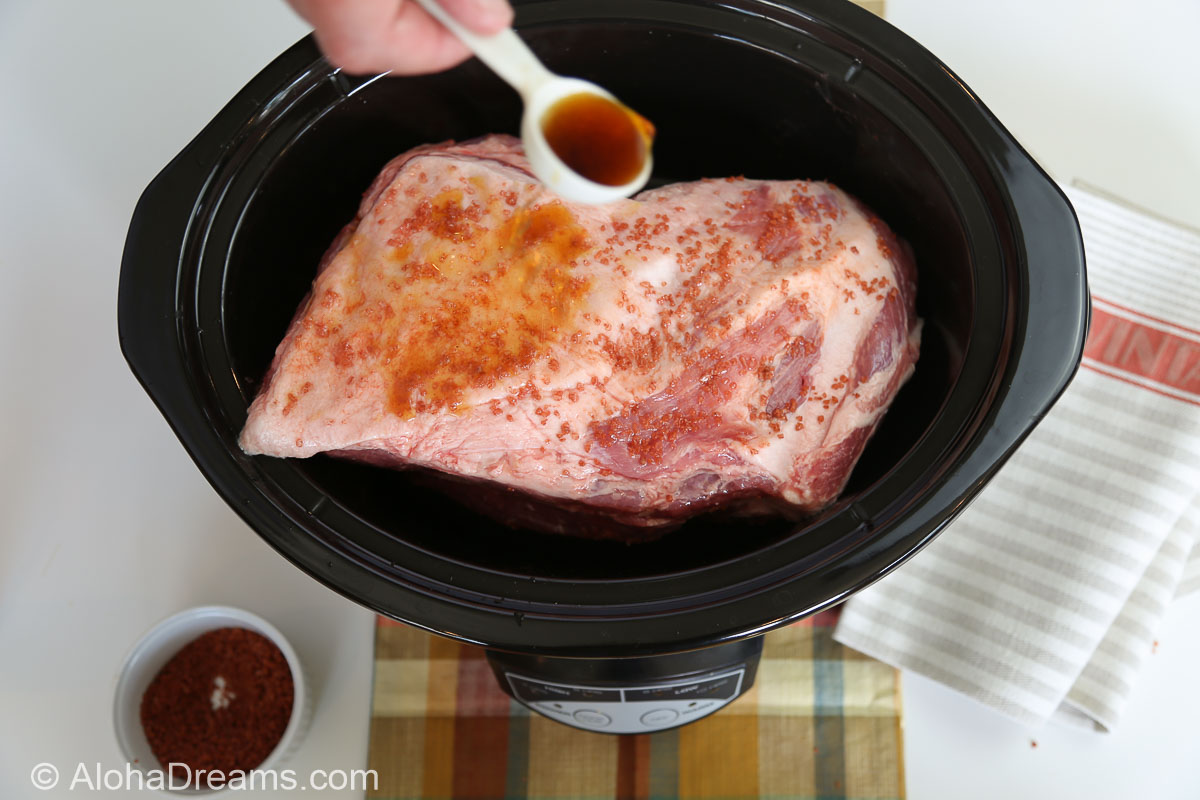
Next, put your roast in the slow cooker, fat side up. Pour 1 tablespoon liquid smoke over the top of a 4 – 6 pound roast (and 2 tablespoons for a 9 – 10 pound roast). Put the cover on the slow cooker and set to LOW. There is no extra liquid needed with the roast since it’s cooking low and slow
A 4-6 pound roast will be fall-apart tender after 7-8 hours on LOW.
It will take a 9 pound roast about 12 hours on LOW to cook to the point that it is fall-apart tender. It will become fork tender after 10 hours, but you want those extra couple hours to make it shreddable. NOTE: Many slow cookers will only stay on for 10 hours on LOW. You may need to set an alarm to remind yourself to re-set the slow cooker for another 2 hours on the LOW setting if it’s going to turn off after 10 hours.
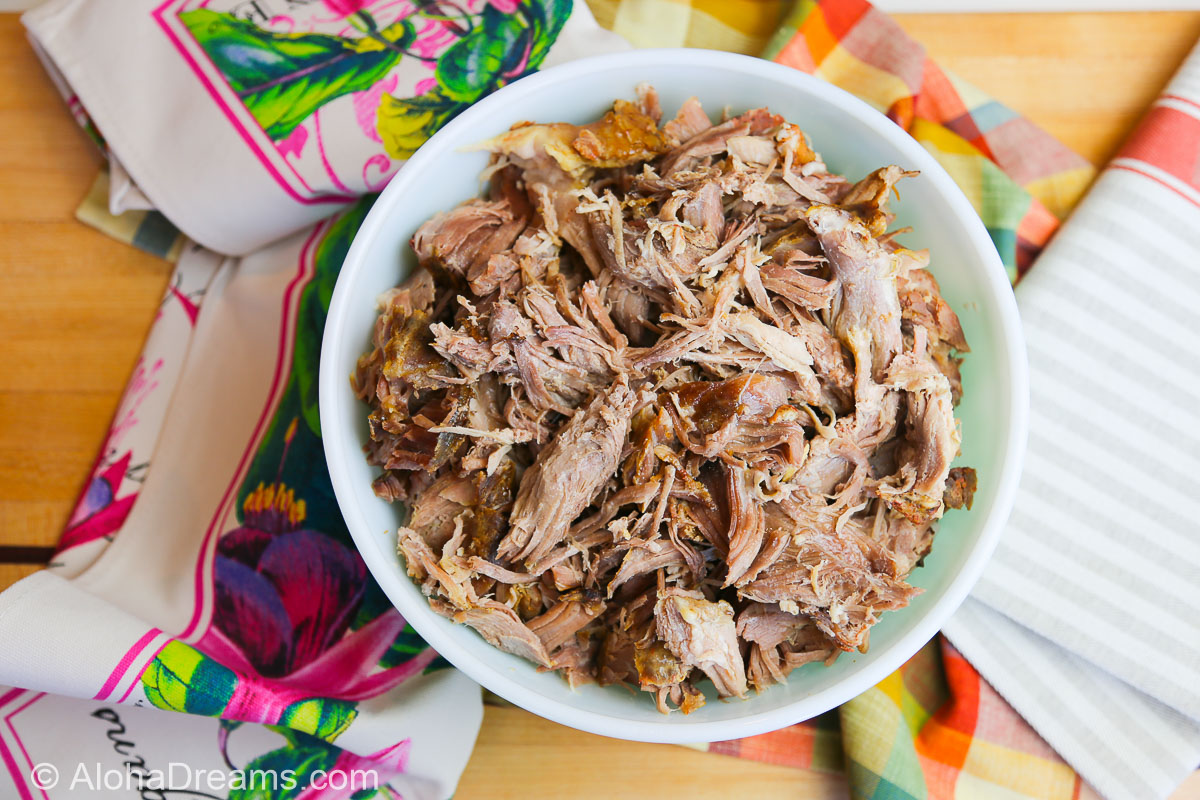
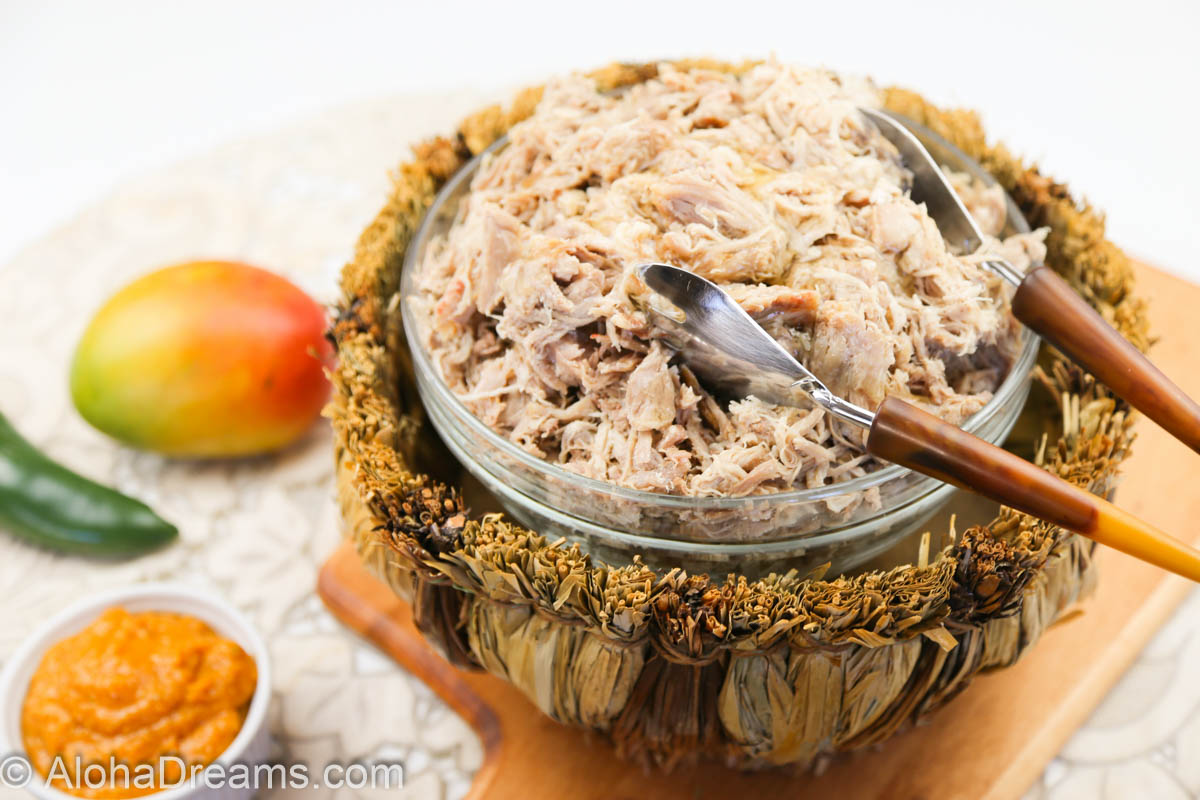
Once your roast is fall-apart fork tender, remove it to a cutting board to shred. Pour the liquid from the slow cooker into a fat separator and set aside. Shred the roast. Once your roast is shredded mix in at least 1/2 cup of the defatted the juice to keep it moist. Serve immediately or return to the slow cooker to hold, covered, up to 2 hours on LOW setting. NOTE: If you’re going to hold for later serving, MAKE SURE TO reserve the remaining juice to add when you’re reheating it.
Just look at how juicy this pork looks. It’s loaded with flavor!

I'm so glad you dropped by. I'm Betsy. Here you'll find my favorite fabulous, trusted recipes - everything from delicious, quick meals for your family to wonderful classics made easy.
I'm also here to help you with large group recipes from 20 to 200. So next opportunity you get to cook for a large group - Say 'Yes!' Then relax. I've got your back.
Ever wished you could build your dream home? How about building your dream home in a tropical paradise? Join me, room by room, as we design and build a fabulous dream home in Hawaii!

Pierce roast all over with a knife, then sprinkle the sea salt evenly all over the roast. Place the roast in the slow cooker, fat side UP. Then pour liquid smoke over roast.
Season with 1 teaspoon kosher salt (OR 1/2 teaspoon table salt).

The page you requested could not be found. Try refining your search, or use the navigation above to locate the post.


If you're planning a vacation to Hawaii, I've got you covered on the very best places to go! From many amazing restaurants to incredible adventures in the surf and on land, this is your go-to source for unique and exciting things to do on the Big Island of Hawaii. Or just take a Virtual Vacation!! Let's go!
If you've been asked to cook for a large group activity, be it a Girl's Camp or a Graduation Party, say Yes! I'm here to help. From Menus to Game Plans to Recipes, I'll help you keep on schedule and turn out amazingly delicious food if you're cooking for a crowd! My recipes are tested and trusted. Let's cook!
Ever wished you could build your dream home? Like amazing house design and home building ideas? Me too! Join me as I design and build a home on the Big Island of Hawaii. Follow along while I design each room. Enjoy a front row seat for the entire amazing construction process. Let's play!
Would you like to throw a Luau, but not sure where to start? Want to know how to build a tiki bar and roast a pig? Here's everything you need to have a luau. How about a Christmas Feast or even a fabulous dinner for your neighborhood supper club? You've come to the right place. Let's party!

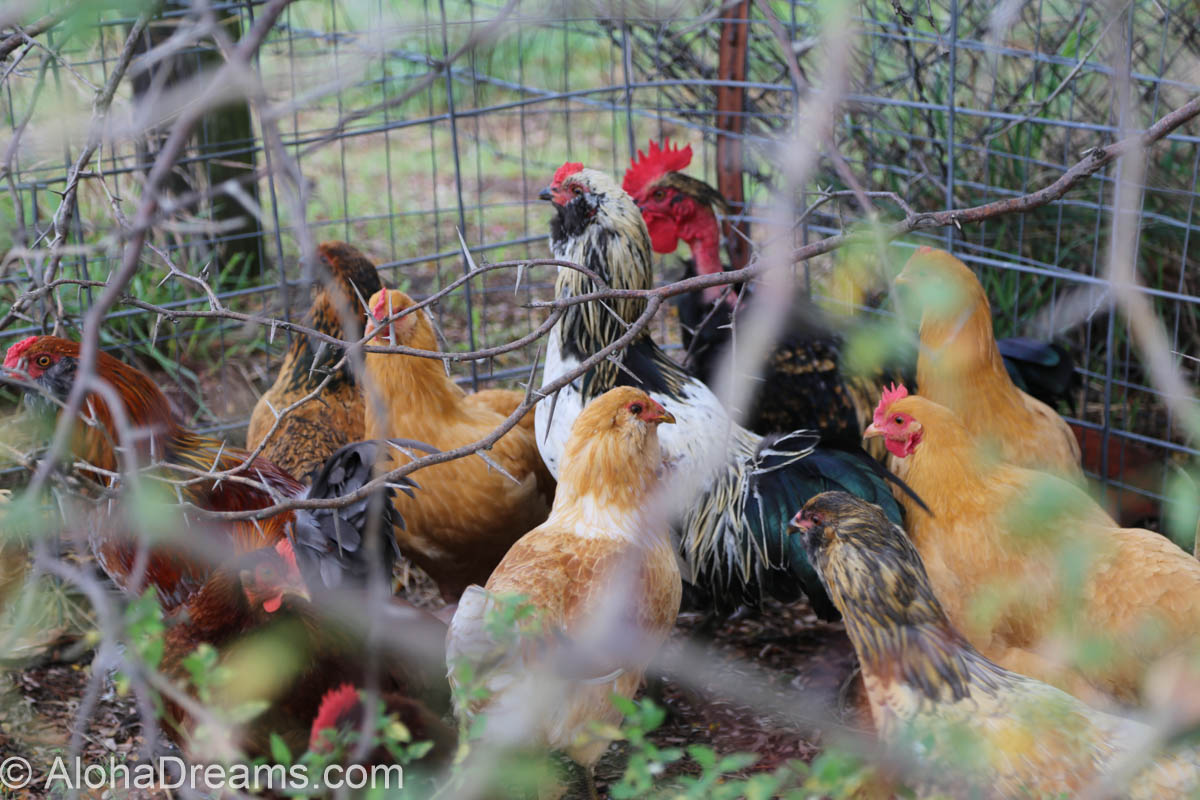
I answered the door one day and there was a friend of ours solemnly holding a nice plump plucked chicken. Jeff had helped him with a project at his home and the chicken was his thanks. I solemnly accepted it, promising to do it justice. That chicken became the BEST chicken and dumplings I’ve ever had. Without exception. It was unbelievably rich and buttery with intense chicken-y flavor. In fact the more I’m thinking about it, the more I think chickens would be a WONDERFUL project. For Jeff.
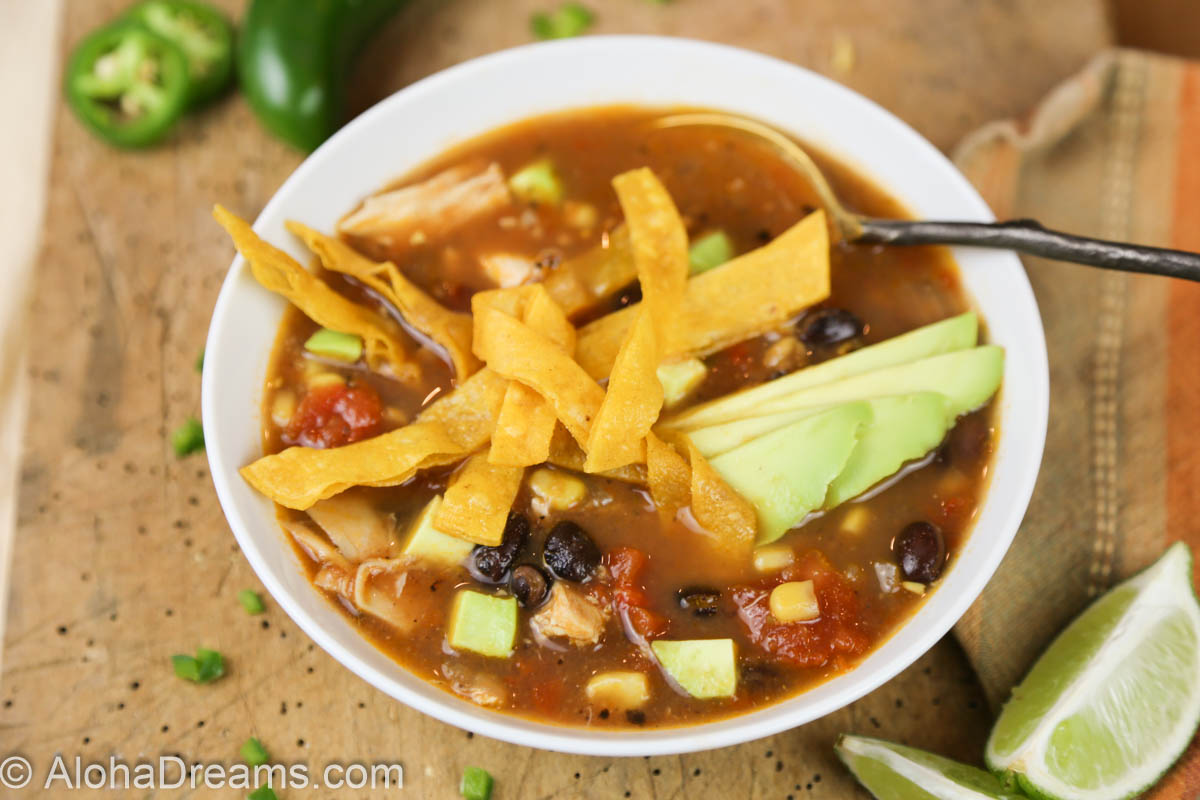
Even when you’re making a quick tortilla soup to get on the table in 30 minutes after a long day, you can easily create all kinds of lovely tomato flavor. But if you’re using already cooked chicken meat, added at the end, you’re going to have a one-note production without much savory depth of flavor. I have the answer.
It’s the boullion baby.
Adding chicken boullion produces that wonderful rich chicken-y flavor in your soup that the free-range chicken brought to my chicken and dumplings. Add in some cumin and oregano along with sweet bits of corn and avocado and you’ve got a WINNER! My easy, make ahead very flavorful poached chicken can be shredded and used for this recipe.
There’s so much to love about this soup. …..
You’ll have a hard time picking your favorite part. There’s so much rich chicken flavor from the boullion and the crunchy toppings send it over the top. The avocado, really makes it too. Very flavorful but not too spicy. You could even top it with a nice handful of Monterey Jack cheese! I made extra crispy tortilla strips just to snack on while I was waiting for the soup to cook. I’m bad like that.

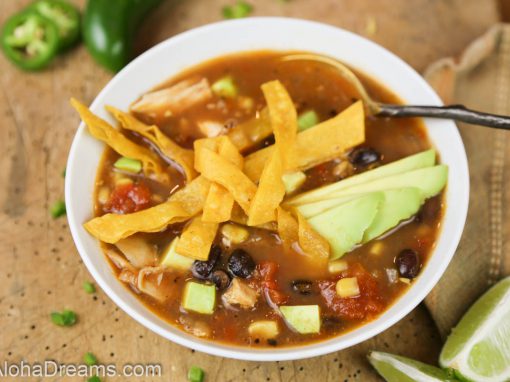
One of the most flavorful chicken tortilla soups you'll eat. A great recipe to use my large-batch, time saving poached chicken recipe or substitute leftover holiday turkey. Very flavorful but not too spicy.
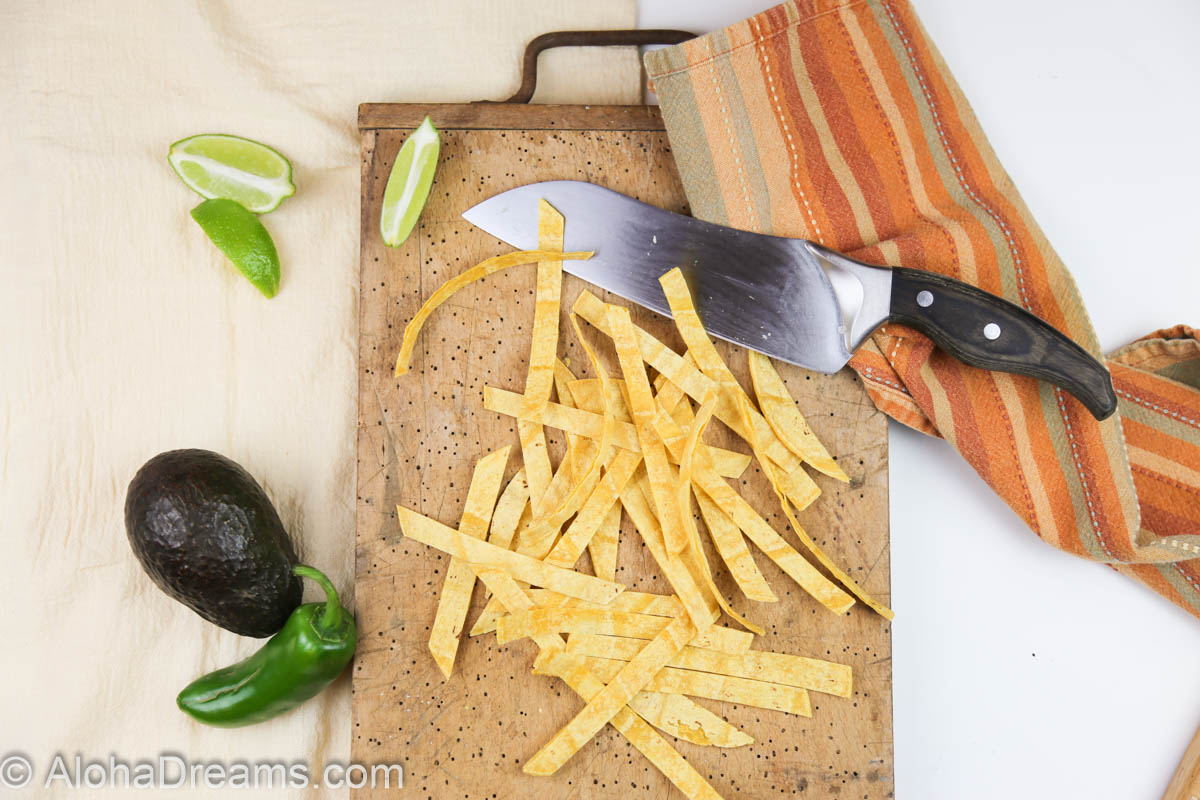
Place the tortillas on a baking sheet and put them in a 200°F oven for 10 minutes to make them easier to work with.
When tortillas done, remove from the oven and cut in half. Next cut the halves into 1/4-inch wide strips and set aside.
To the onions add the chopped jalapeño pepper and cook for 2 minutes more. Add the garlic and cook for 30 seconds more.
Add the tomatoes, chicken stock, beans, corn, 1/4 teaspoon dried oregano, 1/2 teaspoon cumin, 1/2 teaspoon salt, 1 teaspoon garlic powder, and 8 chicken bullion cubes. Increase the heat to high and cook until the soup begins to boil, then reduce heat to a low simmer.
While the soup is cooking, heat 1 cup oil over medium-high heat. Working in several batches, fry the tortilla strips until very slightly browned and crisp. Remove the strips from the pan, salt and let drain on a paper-towel-lined plate.
Meanwhile prep the garnishes by pitting the avocado, removing the peel and cutting the avocado into ¼ inch dices.
After the soup has simmered 15 minutes, add the shredded chicken and cook several minutes until heated through.
To serve, divide half the tortilla strips among 6 individual serving bowls and add soup. Top with avocado, cheese and remaining tortilla strips. Serve with lime wedges.
I'm so glad you dropped by. I'm Betsy. Here you'll find my favorite fabulous, trusted recipes - everything from delicious, quick meals for your family to wonderful classics made easy.
I'm also here to help you with large group recipes from 20 to 200. So next opportunity you get to cook for a large group - Say 'Yes!' Then relax. I've got your back.
Ever wished you could build your dream home? How about building your dream home in a tropical paradise? Join me, room by room, as we design and build a fabulous dream home in Hawaii!
If you're planning a vacation to Hawaii, I've got you covered on the very best places to go! From many amazing restaurants to incredible adventures in the surf and on land, this is your go-to source for unique and exciting things to do on the Big Island of Hawaii. Or just take a Virtual Vacation!! Let's go!
If you've been asked to cook for a large group activity, be it a Girl's Camp or a Graduation Party, say Yes! I'm here to help. From Menus to Game Plans to Recipes, I'll help you keep on schedule and turn out amazingly delicious food if you're cooking for a crowd! My recipes are tested and trusted. Let's cook!
Ever wished you could build your dream home? Like amazing house design and home building ideas? Me too! Join me as I design and build a home on the Big Island of Hawaii. Follow along while I design each room. Enjoy a front row seat for the entire amazing construction process. Let's play!
Would you like to throw a Luau, but not sure where to start? Want to know how to build a tiki bar and roast a pig? Here's everything you need to have a luau. How about a Christmas Feast or even a fabulous dinner for your neighborhood supper club? You've come to the right place. Let's party!

 Aloha Dreams
What do you think? Isn’t he just adorable? He’s my Christmas present and 22.5 pounds of needle-sharp puppy teeth just looking for stray recipe cards to happily shred to bits. I have NEVER said the word “poop” more often in my life! And what’s worse, I’m doing it at 3:00 am in the morning. In sub-zero temperatures. In the front yard. At the top of my voice (so as to be ignored over the howling wind). POOP DARN IT JAKE, POOP.
POOP! POOP! POOP!!!!
I’m sure the neighbors are now REALLY wondering what’s going on over here…

Here’s the most recent pic of him.

Notice that wet spot on my brand-new carpet over Jake’s shoulder? That’s AFTER the mess has been cleaned up.
Being a labrador, Jake really LOVES water. He is especially fond of the jacuzzi. Filled or not, occupied or not. I thought you might like to see just what we’re dealing with. Enjoy. And stay tuned. I have a lot of great recipes coming up, including a wonderfully flavorful Tortilla Soup and Tiramisu for a Crowd (or just you).
And stay tuned. I have a lot of great recipes coming up, including a wonderfully flavorful Tortilla Soup and Tiramisu for a Crowd (or just for you!).
I'm so glad you dropped by. I'm Betsy. Here you'll find my favorite fabulous, trusted recipes - everything from delicious, quick meals for your family to wonderful classics made easy.
I'm also here to help you with large group recipes from 20 to 200. So next opportunity you get to cook for a large group - Say 'Yes!' Then relax. I've got your back.
Ever wished you could build your dream home? How about building your dream home in a tropical paradise? Join me, room by room, as we design and build a fabulous dream home in Hawaii!

If you're planning a vacation to Hawaii, I've got you covered on the very best places to go! From many amazing restaurants to incredible adventures in the surf and on land, this is your go-to source for unique and exciting things to do on the Big Island of Hawaii. Or just take a Virtual Vacation!! Let's go!
If you've been asked to cook for a large group activity, be it a Girl's Camp or a Graduation Party, say Yes! I'm here to help. From Menus to Game Plans to Recipes, I'll help you keep on schedule and turn out amazingly delicious food if you're cooking for a crowd! My recipes are tested and trusted. Let's cook!
Ever wished you could build your dream home? Like amazing house design and home building ideas? Me too! Join me as I design and build a home on the Big Island of Hawaii. Follow along while I design each room. Enjoy a front row seat for the entire amazing construction process. Let's play!
Would you like to throw a Luau, but not sure where to start? Want to know how to build a tiki bar and roast a pig? Here's everything you need to have a luau. How about a Christmas Feast or even a fabulous dinner for your neighborhood supper club? You've come to the right place. Let's party!
 Aloha Dreams
Our church has a marvelous fellowshipping program in our women’s organization. Each adult woman in our church is partnered with another woman and the pair is assigned one or several other women in the church to get to know better and to “minister” to in a personal way. We try to sincerely come to know and love these women, help them strengthen their faith and provide service for them in whatever way we can.
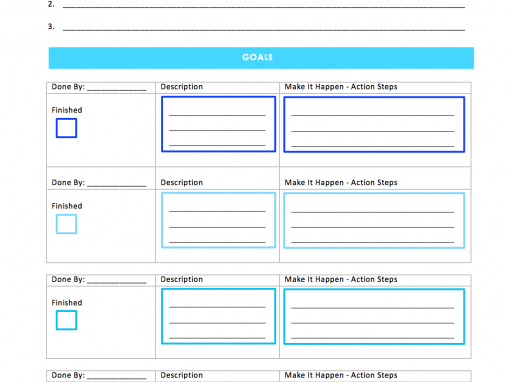
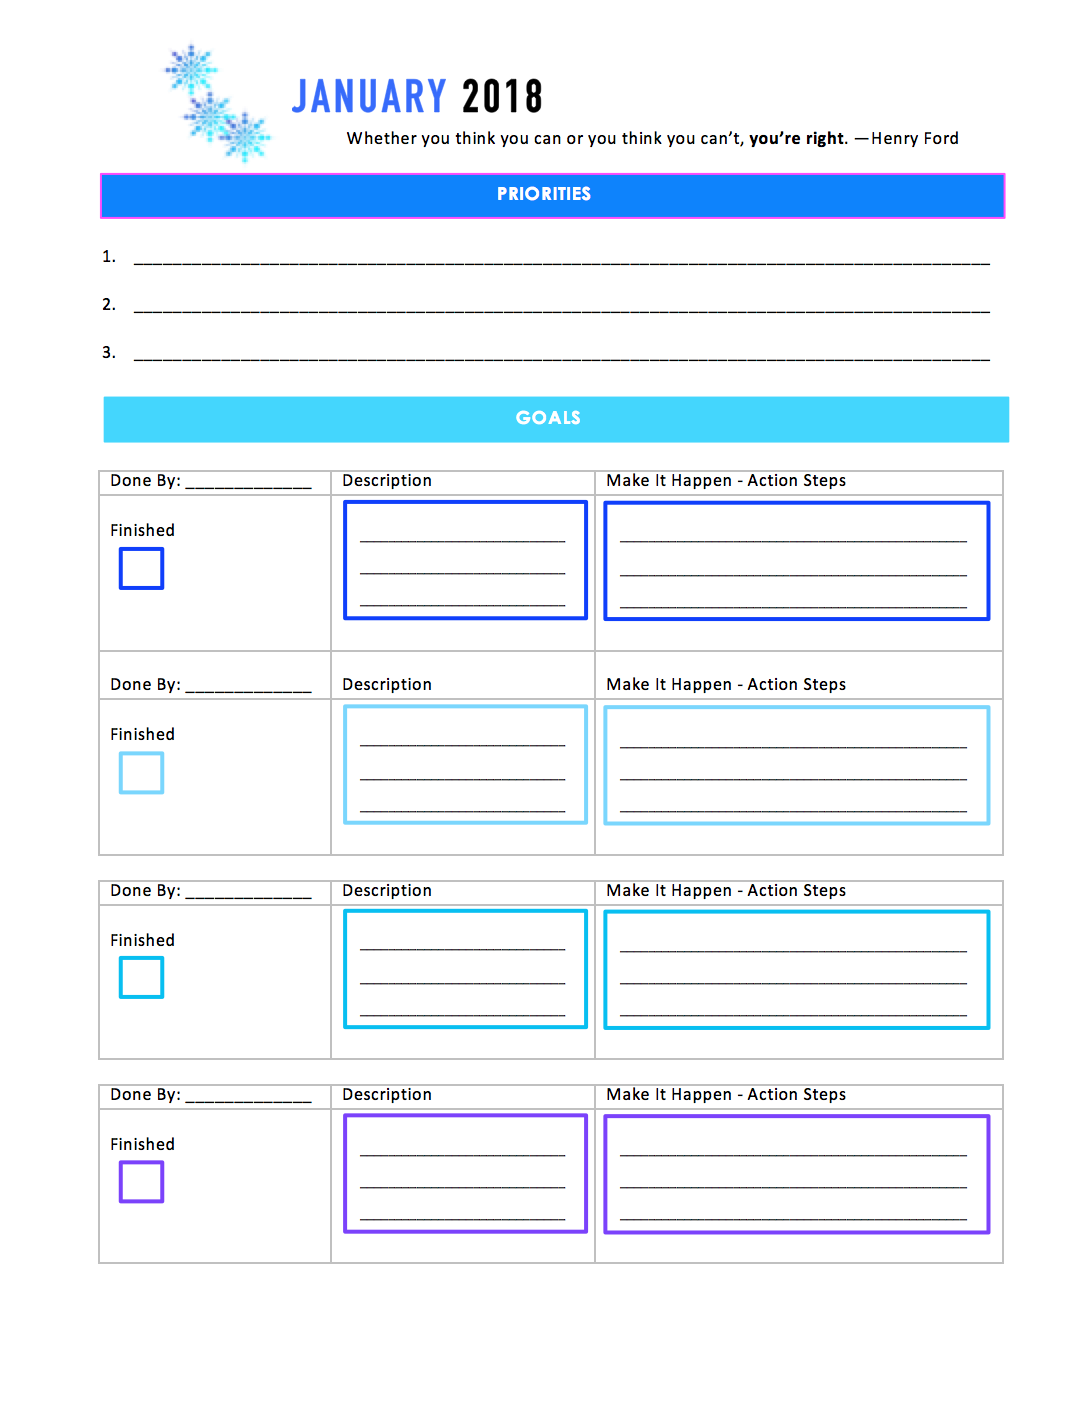
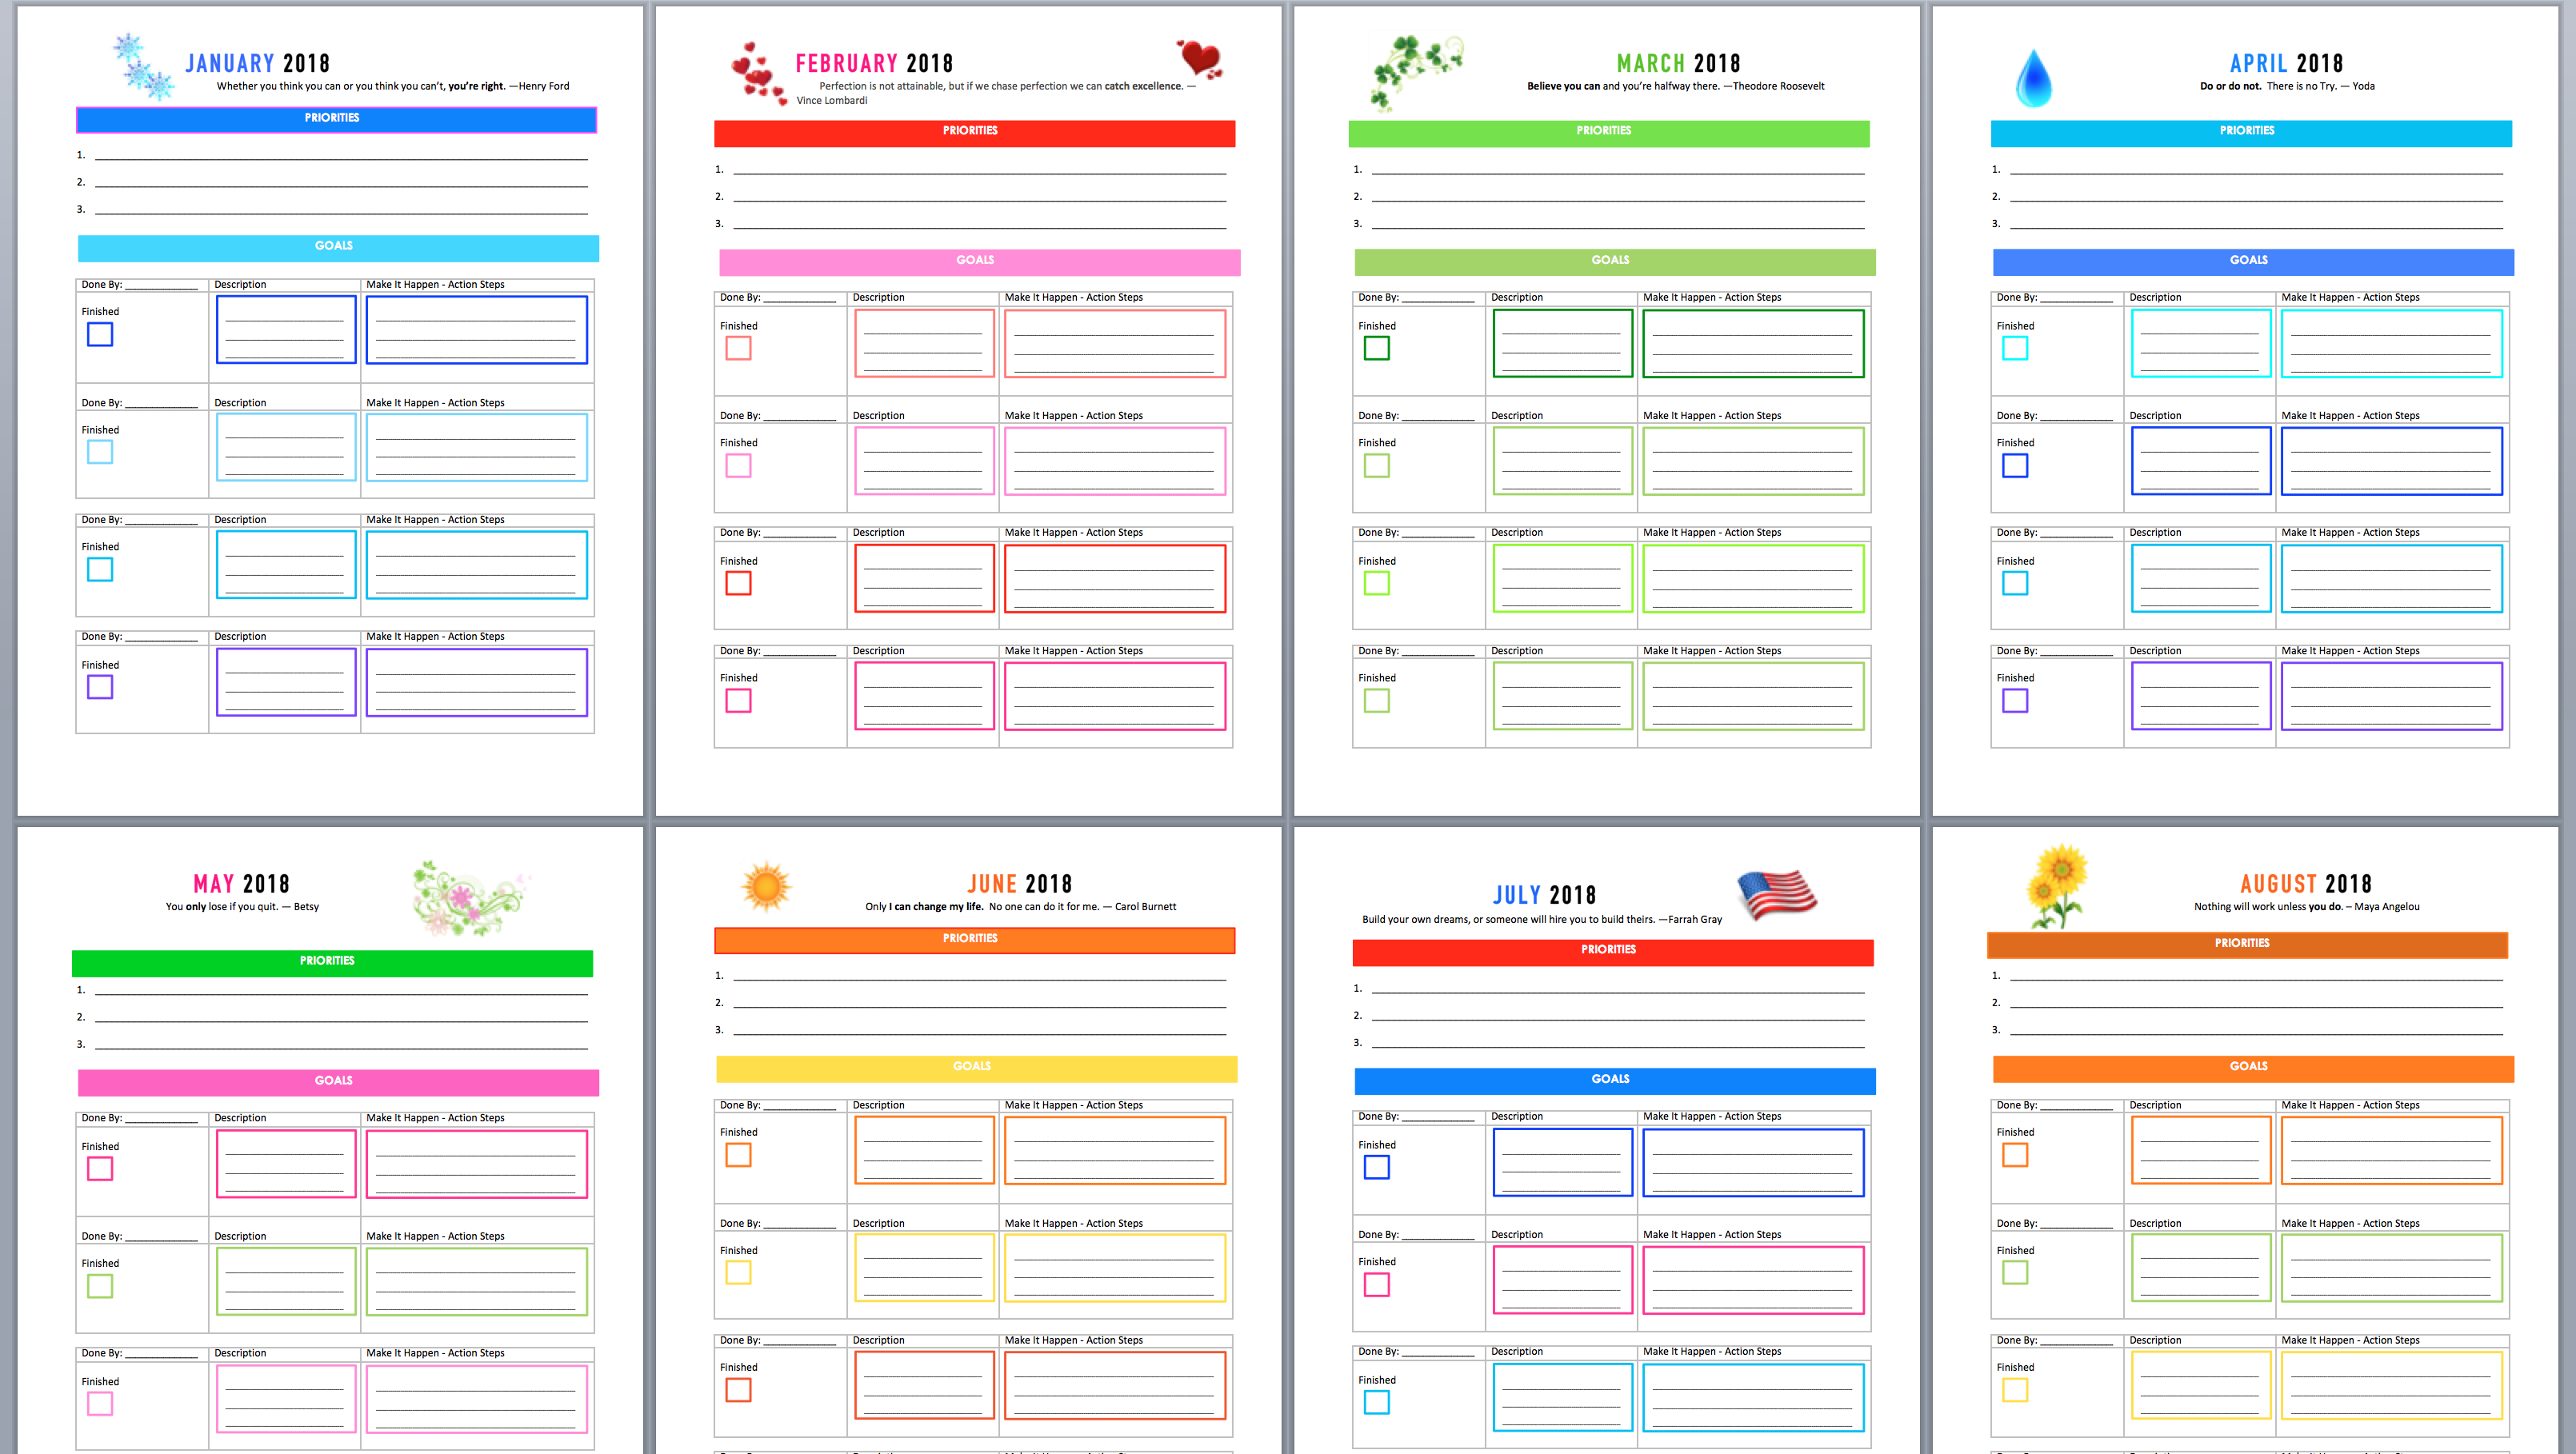
Sometimes, we like to provide a fun handout that we think will help or inspire. Because I believe a goal not written down is just a wish, this month I’ve created a Goal Setting Calendar. Since I think you might like it too, for yourself – or someone you would like to help or inspire, I’ve included free printable 2018 Monthly Goals Worksheets. Just click the link below and enjoy!
Here’s a sample of what they look like.
I'm so glad you dropped by. I'm Betsy. Here you'll find my favorite fabulous, trusted recipes - everything from delicious, quick meals for your family to wonderful classics made easy.
I'm also here to help you with large group recipes from 20 to 200. So next opportunity you get to cook for a large group - Say 'Yes!' Then relax. I've got your back.
Ever wished you could build your dream home? How about building your dream home in a tropical paradise? Join me, room by room, as we design and build a fabulous dream home in Hawaii!
If you're planning a vacation to Hawaii, I've got you covered on the very best places to go! From many amazing restaurants to incredible adventures in the surf and on land, this is your go-to source for unique and exciting things to do on the Big Island of Hawaii. Or just take a Virtual Vacation!! Let's go!
If you've been asked to cook for a large group activity, be it a Girl's Camp or a Graduation Party, say Yes! I'm here to help. From Menus to Game Plans to Recipes, I'll help you keep on schedule and turn out amazingly delicious food if you're cooking for a crowd! My recipes are tested and trusted. Let's cook!
Ever wished you could build your dream home? Like amazing house design and home building ideas? Me too! Join me as I design and build a home on the Big Island of Hawaii. Follow along while I design each room. Enjoy a front row seat for the entire amazing construction process. Let's play!
Would you like to throw a Luau, but not sure where to start? Want to know how to build a tiki bar and roast a pig? Here's everything you need to have a luau. How about a Christmas Feast or even a fabulous dinner for your neighborhood supper club? You've come to the right place. Let's party!
 Aloha Dreams
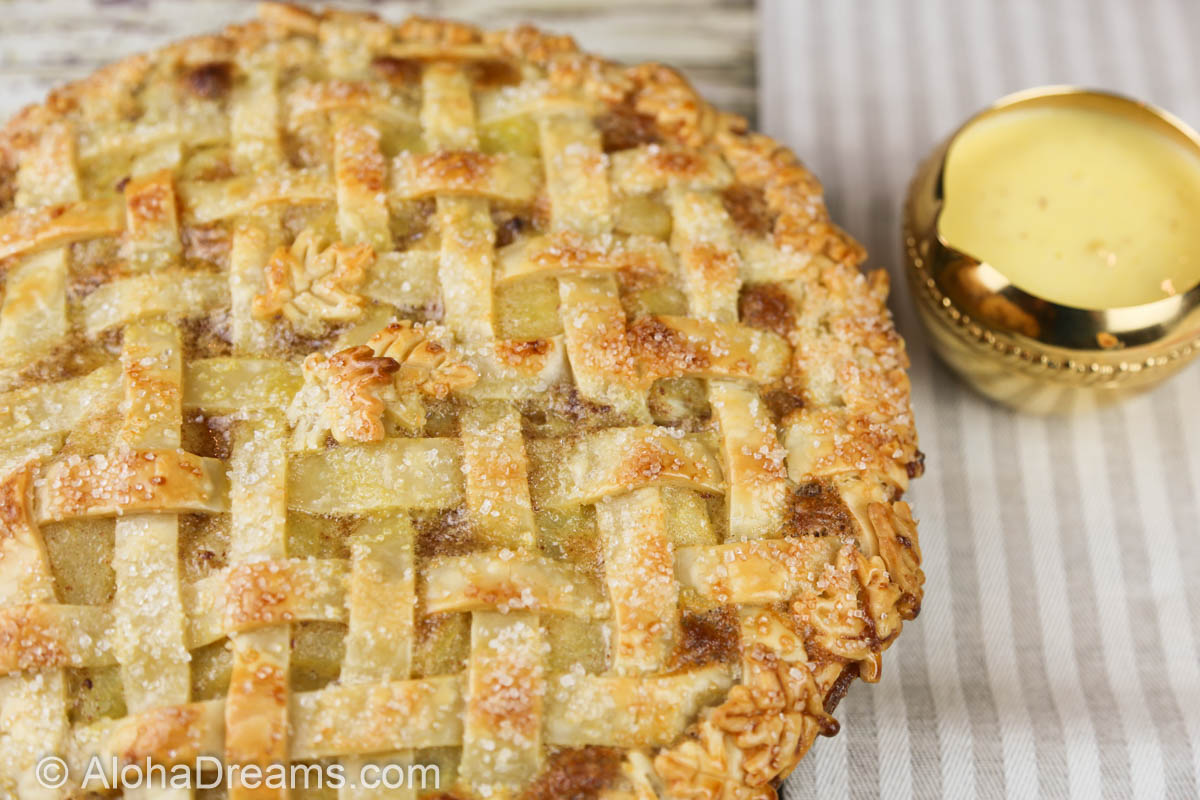
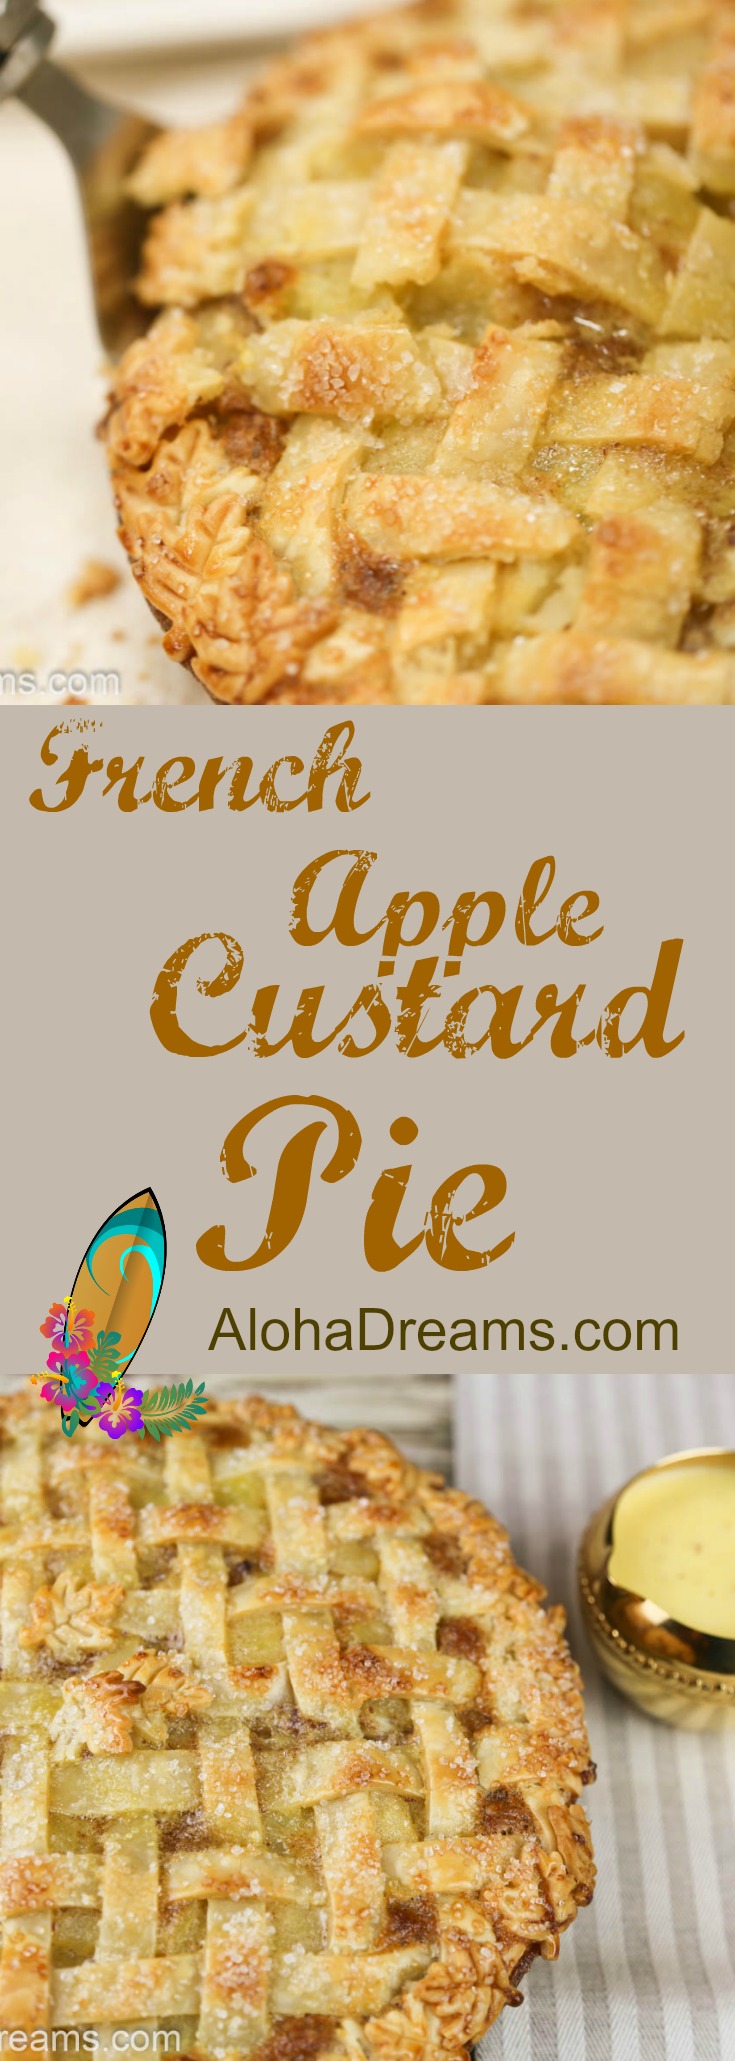
Hi guys! So are you looking for a wonderful, over-the-top, (easy) way to say “I love you!” for the Holidays? Well, here it is. This pie is gorgeous (if I do say so myself), it tastes great – – – and you know what? It’s. Really. Not. That. Difficult.
Come with me and I’ll show you how. There are several secrets to this, and they apply to any pie you’re going to make this holiday season. Let’s do this!
This is a 2-crust pie. You can make your own crust – or if you’re in a hurry like I was, you can use ready made crust (the kind that comes in packages of 2 rolls). Looking like this, no one will notice (or even care) that you didn’t make the crust from scratch, unless you tell them. This pie also uses what’s known as a blind baked bottom crust.
There are two times when blind baking is necessary: 1) when you’re making a custard pie or 2) when you will not be baking the pie filling. Sometimes recipes for Pumpkin Pies (which are a type of custard pie) call for blind baking the crust because the moisture in the pumpkin filling can make the crust soggy before it has time to finish baking.
I know blind baking a pie crust can sound somewhat intimidating, especially if the idea of simply baking a pie is already in your category of ‘big hairy task that I’d rather not deal with’. If that’s the case – relax. We can do this together. Blind baking is nothing more than letting the (bottom) pie crust bake partially on its own before you add the filling. It’s really easy – especially once you know a few baker’s secrets.
I know there are some pretty ceramic versions out there, but trust me – a clear glass pie pan cooks better. Besides you can monitor the done-ness of your crust in the glass pan, whereas you have no visibility with the ceramic or metal pan.
If you’re using a ready made pie crust, you’ll want to let it come to room temperature before unrolling it and putting it in your pie pan, otherwise it will tear pretty easily as you’re unrolling it. But once you’ve shaped it in the pan then it needs to get cold again before you pop it in the oven. This is to help the dough keep its shape.
Once the pie has hung out for at least an hour in the refrigerator, lay a large sheet of aluminum foil over the dough and gently press it down to conform to the shape of the dough/pan. Don’t do this before the dough is cold otherwise you run the risk of the foil sticking to the dough. Some recipes call for parchment paper instead of the foil, but I like the foil because it also serves as a shield to keep the edge of the pie crust from burning. Pie edges tend to burn easily and we don’t want that!
Once you’ve gently molded the foil, add pie weights or pour in sugar to come up 3/4 of the way on the sides of the dish. This is just another step to help your pie keep its shape. Without this step your pie will puff up on the bottom and slump on the sides. (No puffy bottom, slump-y sides on our watch!) Notice we didn’t dock the pie (prick it all over the bottom with a fork). That’s because docking is not necessary with this method and you don’t want holes in the bottom of your crust with a custard filling. Once your pie is ready for the oven it should look like the following picture with the pie weights (little ceramic balls) mostly filling the aluminum foil shield. I’ve pulled back an edge so you can see the pie underneath, but you’ll want to make sure all the edges are covered.
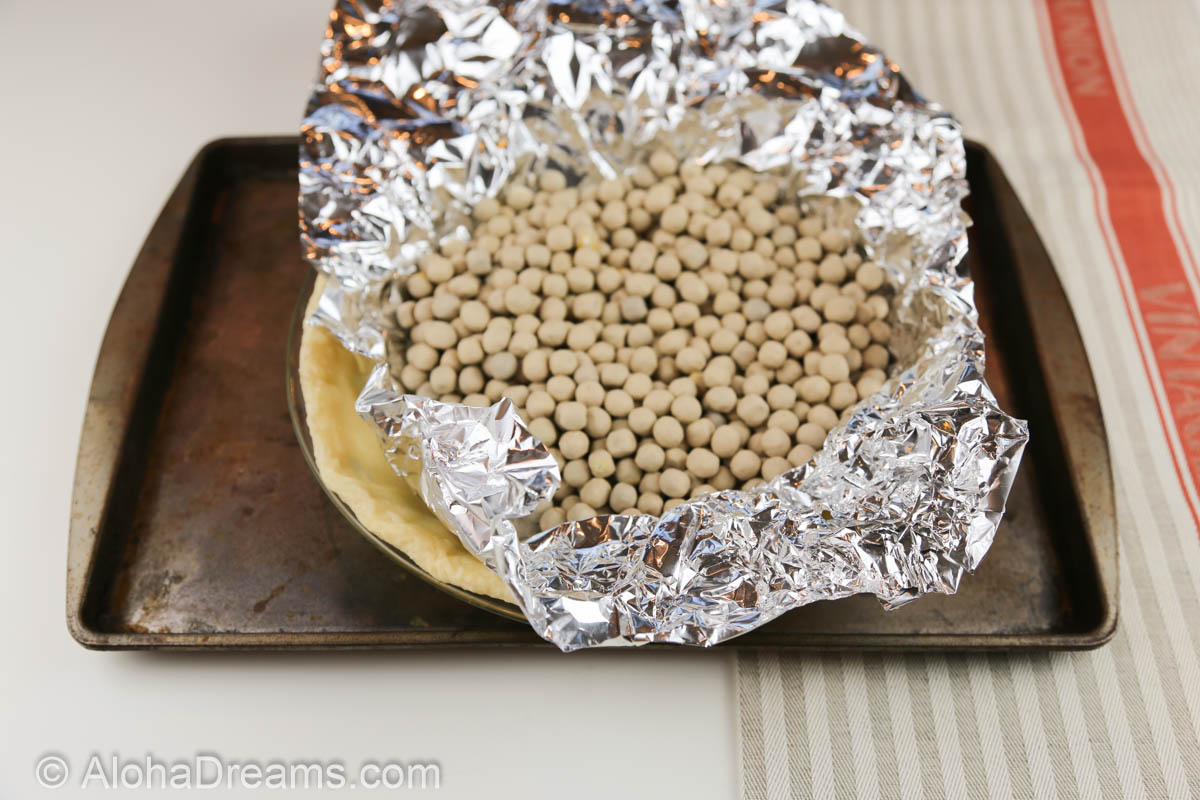
You’ll only need to blind bake the crust at 425 degrees for 10 minutes.
I always put my pies on a rimmed baking sheet. It makes it easier to get them in and out of the oven and makes it less likely you’ll get burned or that you’ll damage any decoration. Now that we’ve got the crust under control, it’s on to the filling!
This helps keep the filling from being too loose and watery.
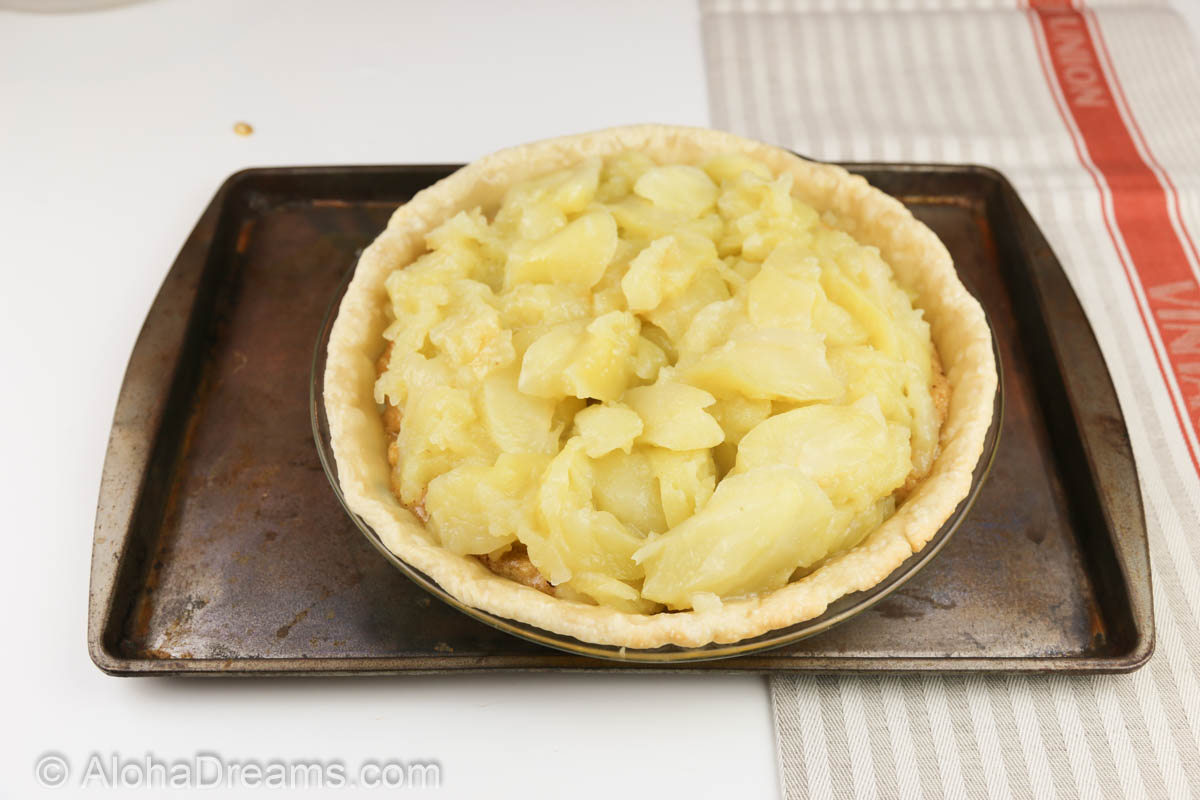
I love to serve over-the-top dishes, like miles-high meringue on my Lemon Meringue pies, or decadent layer cakes or luscious sauces – it makes my family and guests feel special and loved! One of the best ways to do this with an apple pie is to use plenty of apples so the top of the pie is domed and bursting with apple goodness.
The rich creamy custard is the perfect foil to your tart, delicious apples. I like to start with a layer of about 1/2 the apples and 1/2 the custard to line the bottom crust after it’s done partially baking, like this.
Then a layer of the rich creamy custard.
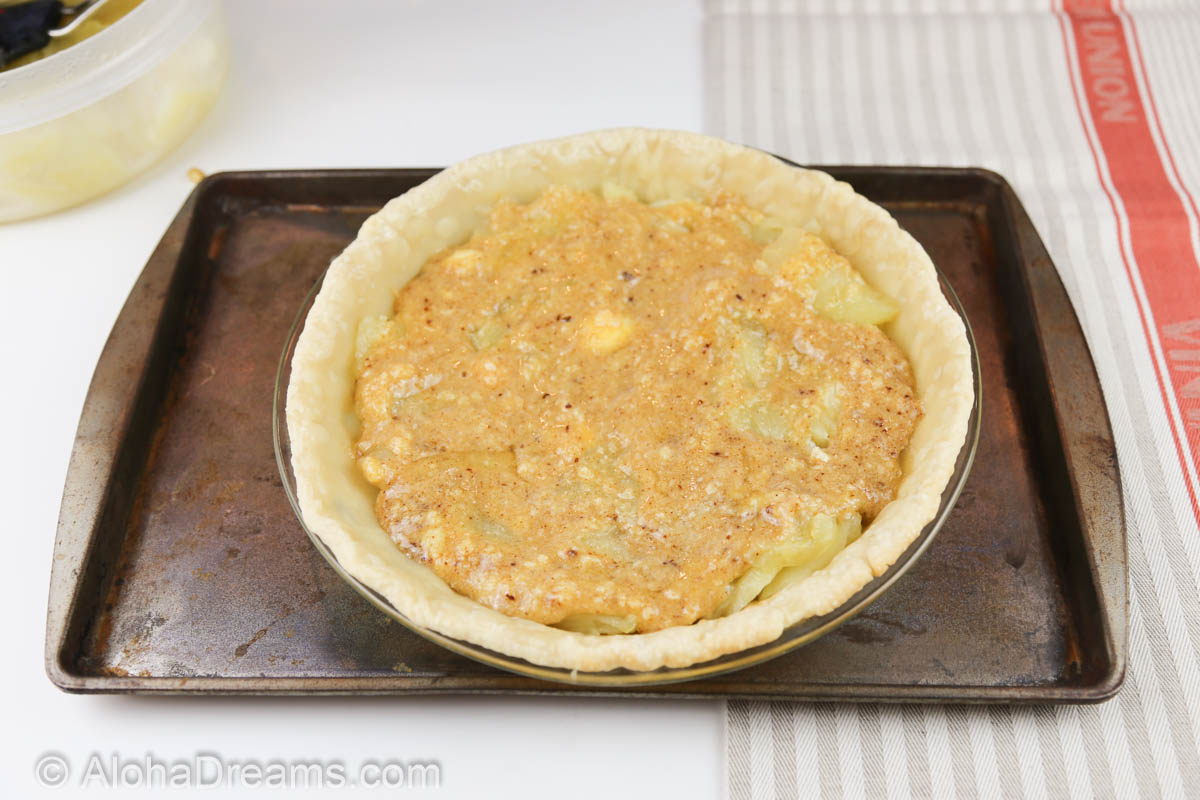
Followed by the rest of the apples and the rest of the custard. Notice the pie is still on the baking sheet just in case the custard bubbles over the crust. I hate cleaning ovens, and the baking sheet also helps to prevent this!
We eat first with our eyes. This pie is delicious – and one bite will prove it. But before you even put a fork in it, wouldn’t you guess it tastes great? That’s because it looks great. It’s like being at Disney World. You expect an amazing experience before you even begin to explore the park. That’s not by accident. You’re visually being primed for that attitude. Everything you see is telling you at varying degrees of subliminal messaging, “this is going to be AMAZING.” A beautiful dessert does the same thing. And it’s really not hard. Trust me.
Ready made dough is generally a LOT easier to work with than homemade if you’re going to decorate a pie. It’s the correct thickness, it’s a consistent thickness and it’s the correct size.
I like to cut stripes for a lattice and then weave them on parchment paper. This allows me to get them just right before I put them on the pie. Once I’ve woven them I press down at each intersection of dough to ‘weld’ the strips in place. Then I put them in the refrigerator for at least an hour to cool down so they hold their shape. I use dough cutters to cut decorative leaves at the same time. Once you’re done you should have something that looks like this.
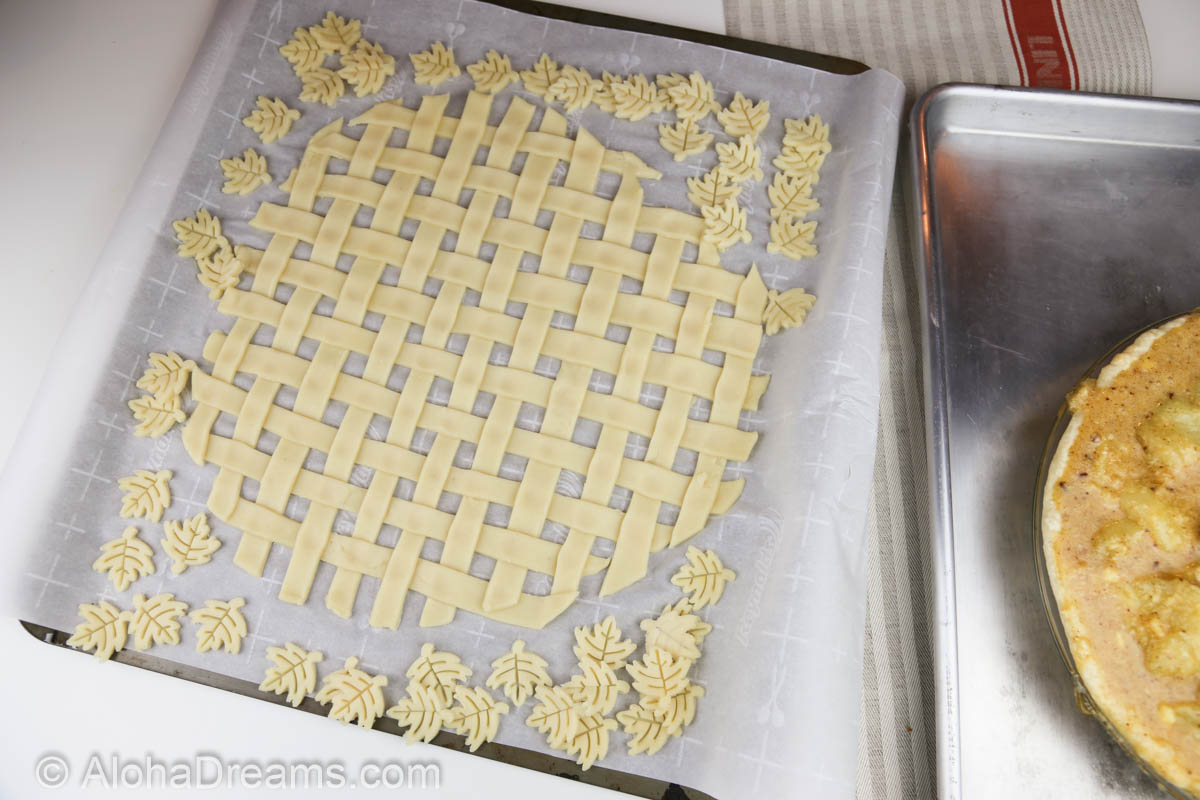
Now comes the fun part. (No, really!) Move the leaves aside and position your parchment paper beside your pie. Slide your hands under the paper and lift it up so that the edge of the pie is touching about an inch into the edge of the lattice. Then gently flip the parchment paper over the pie so the lattice is transferred to the the top of the pie. If you’ve thoroughly pressed down at each intersection prior to putting the lattice in the fridge, your lattice should hold together when you do this. If it doesn’t, gently move any strips back into place. It should now look like this.
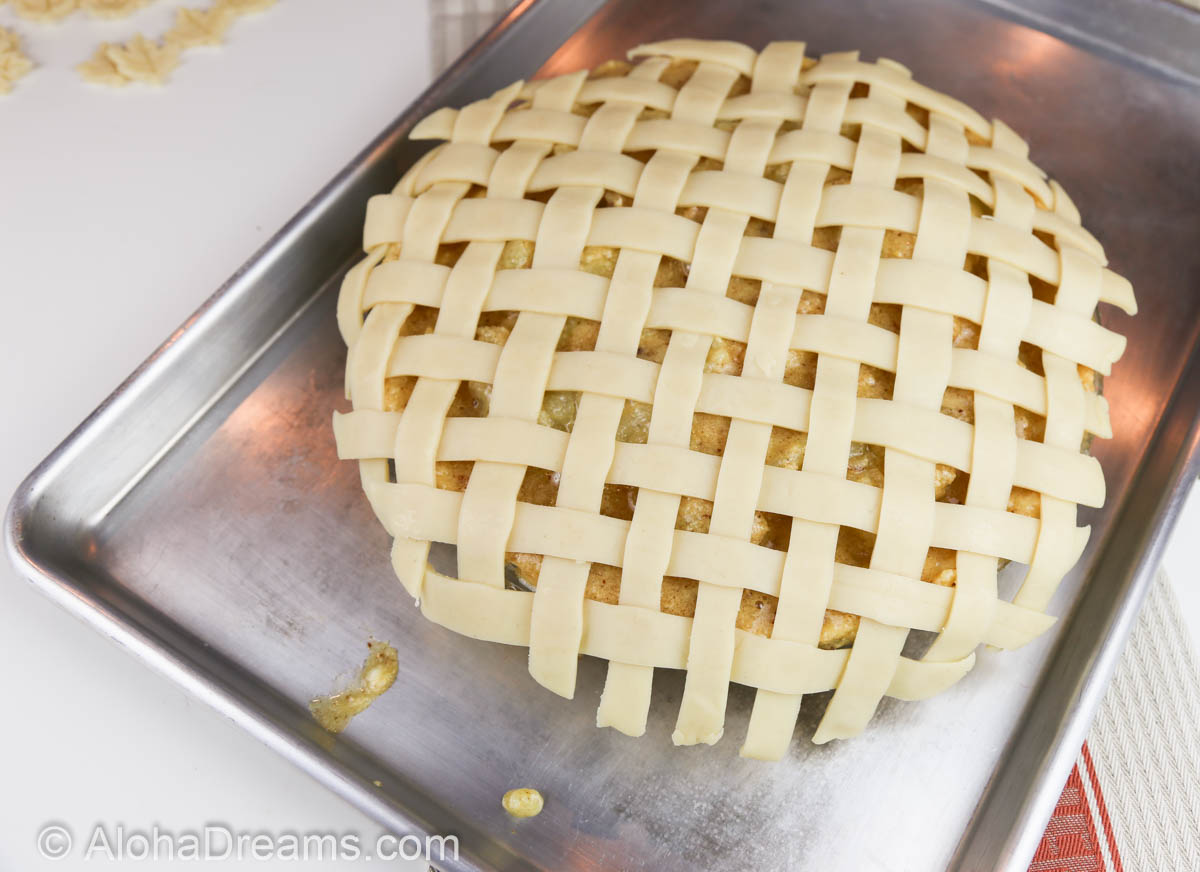
Simply trim the edges by running a paring knife around the glass and remove the excess dough.
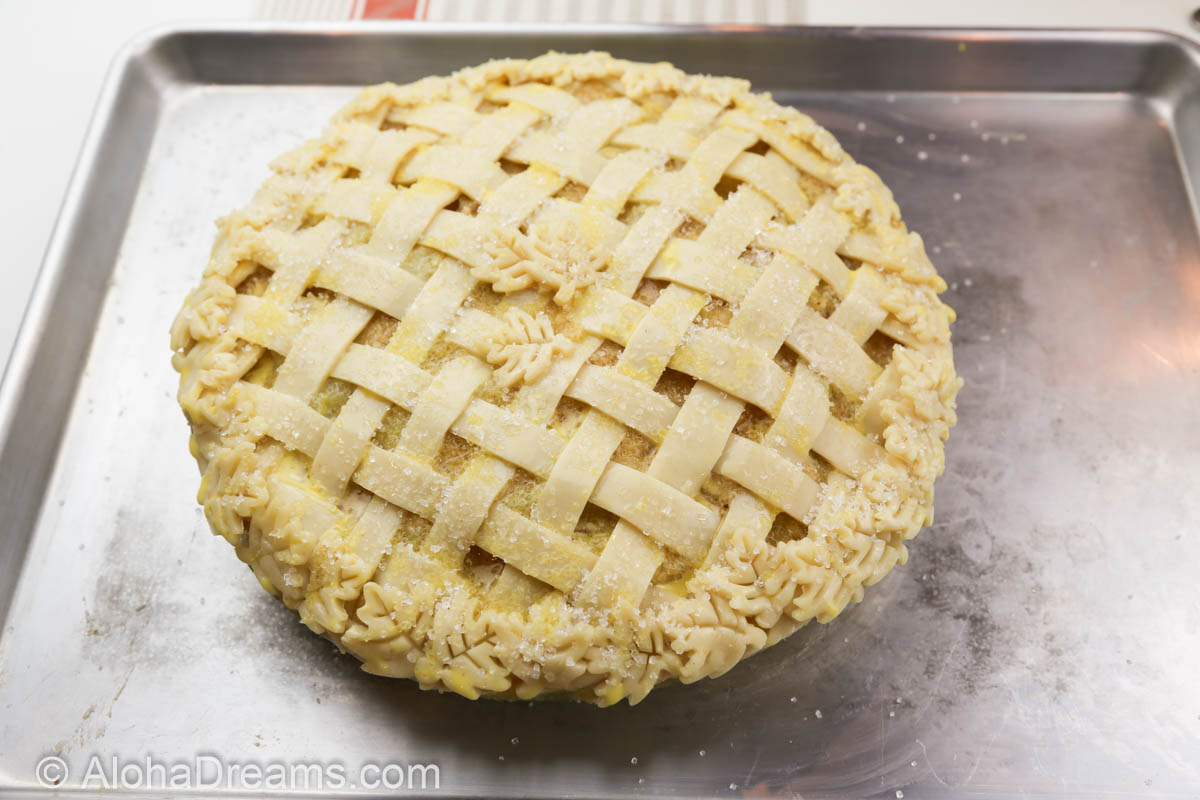
If you have any decorative items, like my leaf cut-outs, brushing an egg wash on the top crust will not only help them adhere, it will produce a beautiful brown, drool-worthy crust.

One of the reasons these pies always catch everyone’s eye is because I sprinkle them heavily with sanding sugar. Not only is it tasty, it sends a subtle message that this golden, flaky, crunchy thing is sweet and delicious. Alway remember the sanding sugar. it really helps take your pie over the top.
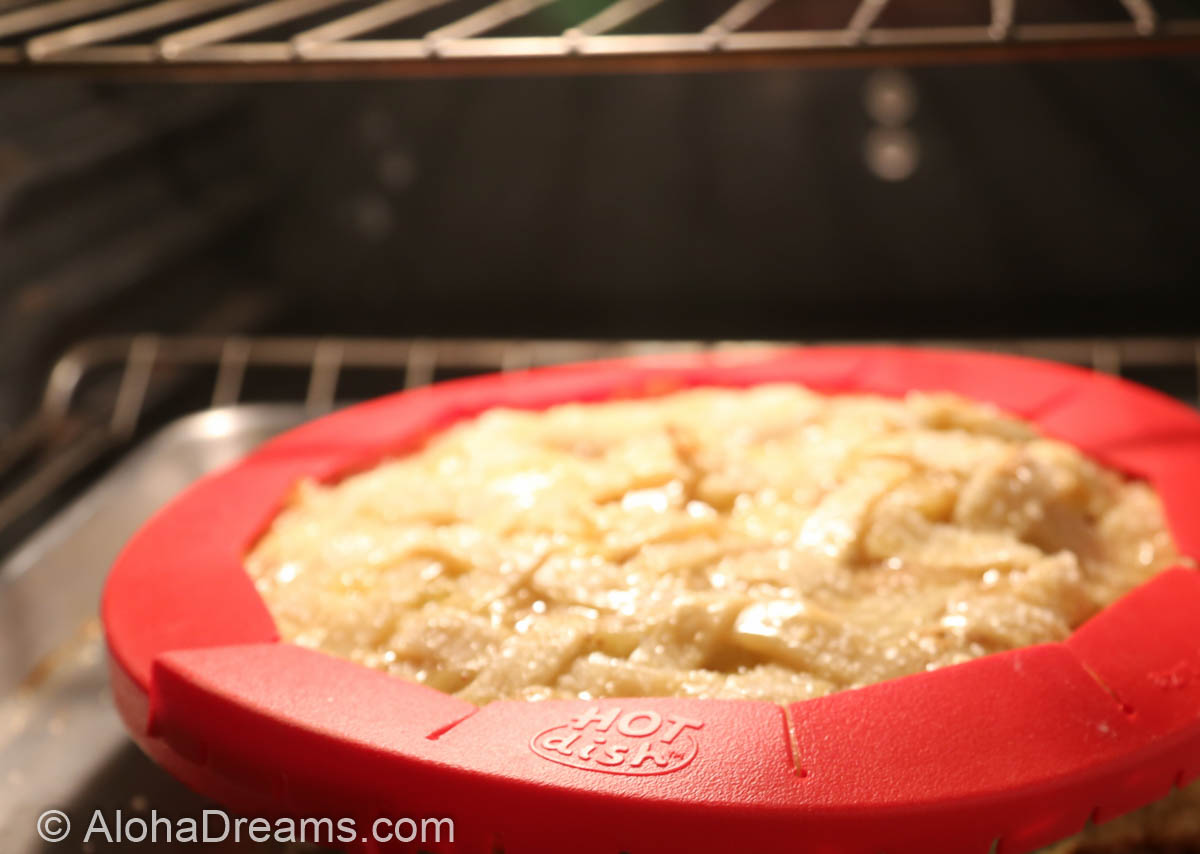
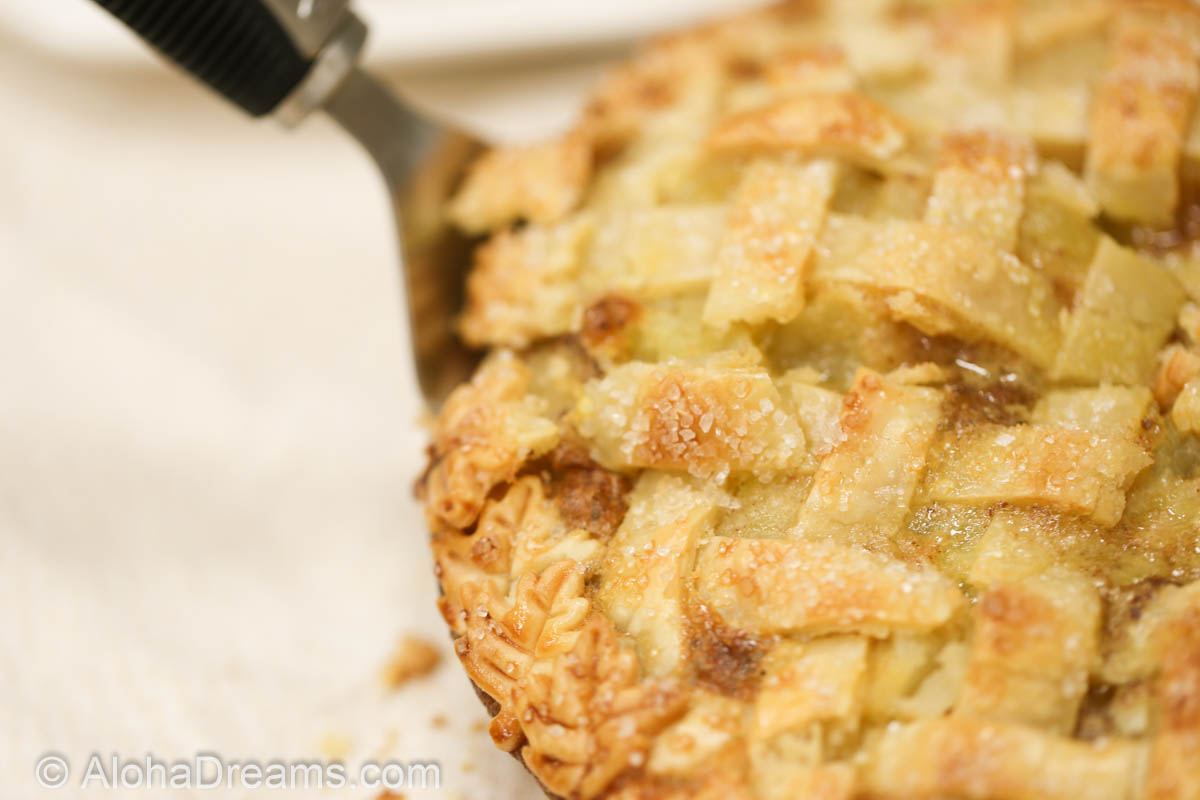
Your two remaining jobs are: 1) Don’t let it get broken and 2) Don’t let it burn
You can protect it from breaking (as well as protect your oven from bubble-overs) by placing your pie on your rimmed baking sheet. This enables you to safely move it around without damage.
To prevent it from burning I watch it like a hawk and when the edges get to the desired degree of golden perfection I slap a pie shield on them. I also cover any spots that are getting dark golden brown with small (couple inch) pieces of aluminum foil so they don’t get any darker and burn.
Finally, thoroughly protected, I let it cook until NONE of the top crust has that raw, oily doughy look. Once it all looks flaky and done, you’re rewarded with this.
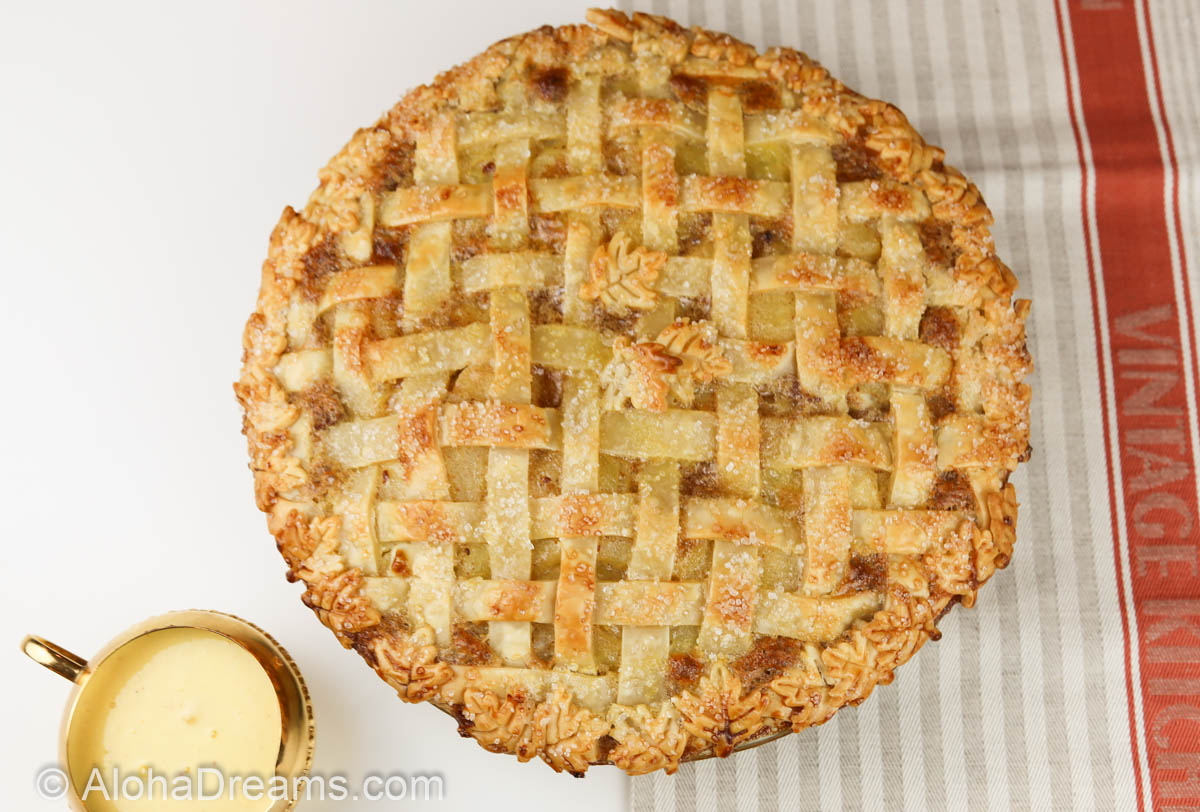
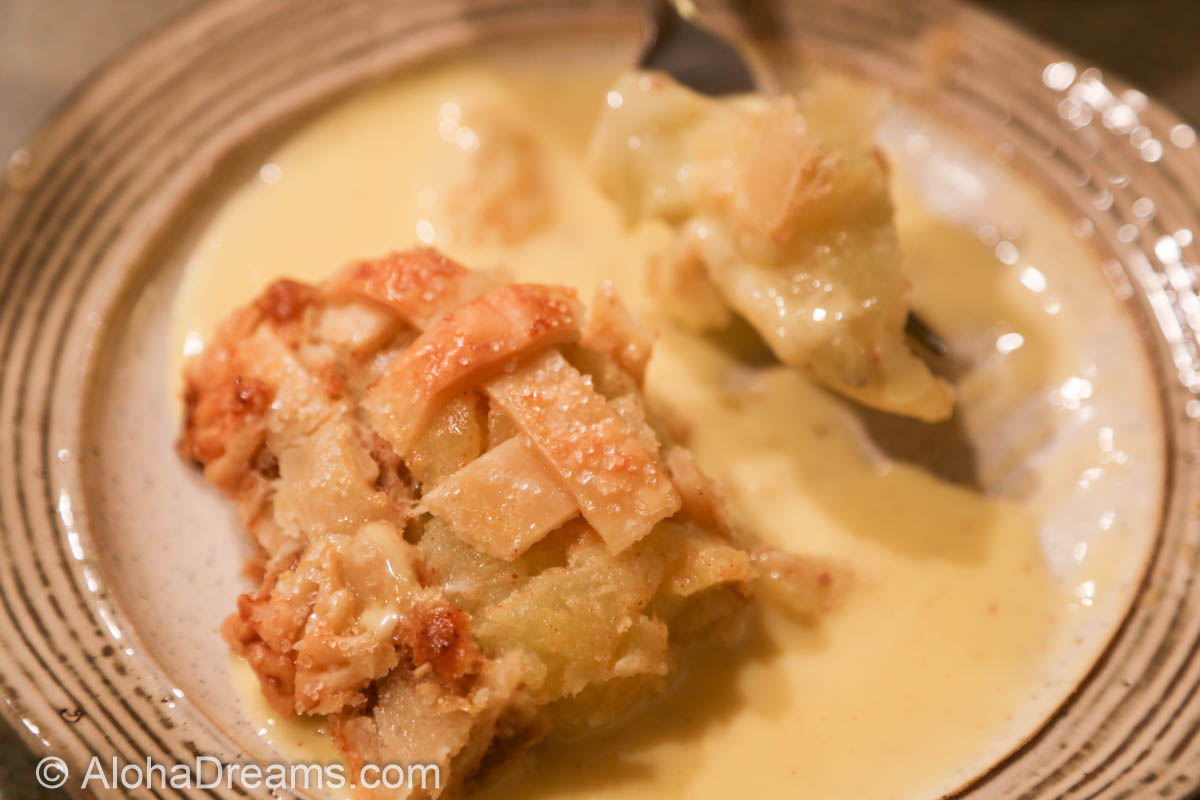
Believe me it tastes every bit as good as it looks.
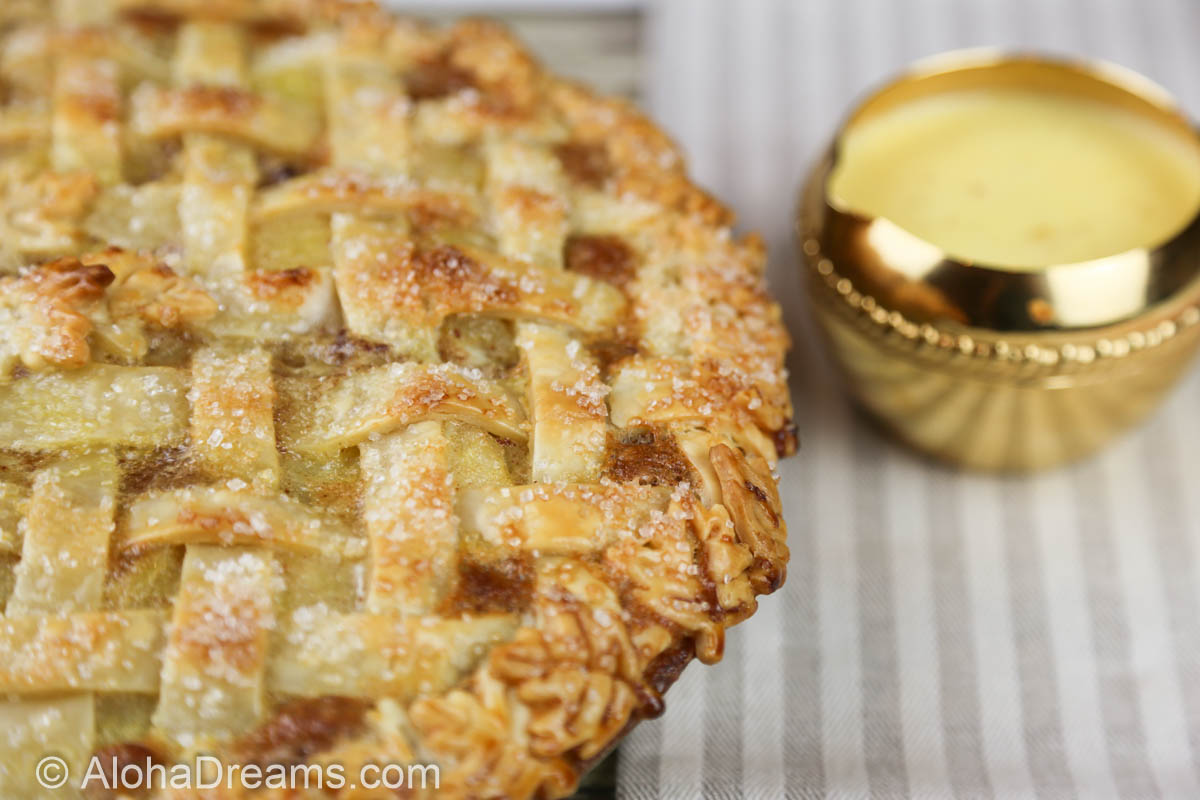
The final, over the top, make ’em howl at the moon, step is a simple (it’s easy) Creme Anglaise sauce. You REALLY need this sauce in your life. It’s not low-cal, but hey – it’s the HOLIDAYS. Enjoy!

In large skillet over medium-low heat, combine filling ingredients. Sauté about 5 minutes, stirring occasionally. DO NOT OVER COOK OR YOU’LL MAKE APPLESAUCE. Remove from heat. Set aside.
After the dough in the pie pan has chilled an hour, lay a sheet of aluminum foil over the dough and gently press it down to confirm to the shape of the pan. Fold over the edges to prevent the edges burning and pour in pie weights or sugar. Weights or sugar should come up ¾ of the side of the pie to prevent the crust from puffing up and losing its shape while cooking. Place on a baking sheet (for easy transport) and partially bake crust at 425 degrees F for 10 minutes. Remove from oven and set aside.
Spoon ½ apple mixture in pie crust-lined pie pan. Pour ½ custard mixture over apples. Add remaining apples and pour in remaining custard.
Gently place the woven crust on the top of the filling. Trim and seal the edges, using a paring knife to trim excess dough and then pressing the lattice gently to the bottom crust to seal.
For the Egg Wash: Whisk egg, water and cream, if using, together in a small bowl, then brush over the pie.
Stick on any decorative pieces and then sprinkle sanding sugar heavily over the entire pie top.
Bake at 425 for 35 – 40 minutes or until crust is golden brown and flaky, with no doughy damp areas remaining. Check frequently and cover as necessary with pie shield and pieces of aluminum foil.
Meanwhile, make the Crème Anglaise: In a medium saucepan, bring cream just to a boil. In a small bowl, combine 4 egg yolks and 2/3 cup sugar. Blend a small amount of cream into yolks. Blend yolk mixture into cream and cook over low heat about 10 minutes or until mixture coats a spoon. Do not boil. Remove from heat. Sift in cinnamon and nutmeg. Crème Anglaise may be made up to 2 days ahead and chilled, covered.
To serve, pour small amount of warm Crème Anglaise onto individual plates. Cut warm pie into 8 – 10 pieces and place on the plates.
I'm so glad you dropped by. I'm Betsy. Here you'll find my favorite fabulous, trusted recipes - everything from delicious, quick meals for your family to wonderful classics made easy.
I'm also here to help you with large group recipes from 20 to 200. So next opportunity you get to cook for a large group - Say 'Yes!' Then relax. I've got your back.
Ever wished you could build your dream home? How about building your dream home in a tropical paradise? Join me, room by room, as we design and build a fabulous dream home in Hawaii!
If you're planning a vacation to Hawaii, I've got you covered on the very best places to go! From many amazing restaurants to incredible adventures in the surf and on land, this is your go-to source for unique and exciting things to do on the Big Island of Hawaii. Or just take a Virtual Vacation!! Let's go!
If you've been asked to cook for a large group activity, be it a Girl's Camp or a Graduation Party, say Yes! I'm here to help. From Menus to Game Plans to Recipes, I'll help you keep on schedule and turn out amazingly delicious food if you're cooking for a crowd! My recipes are tested and trusted. Let's cook!
Ever wished you could build your dream home? Like amazing house design and home building ideas? Me too! Join me as I design and build a home on the Big Island of Hawaii. Follow along while I design each room. Enjoy a front row seat for the entire amazing construction process. Let's play!
Would you like to throw a Luau, but not sure where to start? Want to know how to build a tiki bar and roast a pig? Here's everything you need to have a luau. How about a Christmas Feast or even a fabulous dinner for your neighborhood supper club? You've come to the right place. Let's party!
Never miss a single Fabulous Recipe!
Sign UP today and ENJOY free Recipes & Party Ideas in your inbox.
(No spam - I promise!)